Email Form Handler
Watch the walkthrough:
This recipe documents the original proxy-rule email handler. For new projects we recommend building contact forms with Pipelines instead — they support file uploads, database persistence, conditional logic, and richer email templates. The video above walks through the pipeline-based approach end-to-end.
This recipe demonstrates how to receive form submissions via email directly from your static site — no backend code required. BFFless captures the form data and emails it to your configured address with built-in spam protection and rate limiting.
Overview
The Email Form Handler is a proxy rule type that:
- Intercepts POST requests to a configured path (e.g.,
/api/contact) - Captures form data from JSON, URL-encoded, or multipart submissions
- Sends an email with the form contents to your specified address
- Returns a response — either JSON or a redirect to a thank-you page
This is perfect for contact forms, feedback widgets, lead capture forms, and any scenario where you need to receive user input without maintaining a backend API.
Live Example
We use this feature on bffless.app with three different form handlers:
| Endpoint | Purpose | Destination |
|---|---|---|
/api/contact-form | General contact inquiries | support@bffless.app |
/api/feedback-form | Bug reports, feature requests, feedback | support@bffless.app |
/api/pricing-form | Beta access and enterprise inquiries | sales@bffless.app |
Each form submits directly to BFFless, which handles validation, spam filtering, and email delivery.
Step 1: Configure Email Service
Before creating form handler rules, you need to configure an email provider in Settings > Email. BFFless supports:
- SMTP — Any SMTP server (Gmail, SendGrid SMTP, your own mail server)
- Resend — resend.com API
- SendGrid — SendGrid API
For quick setup, Resend offers a generous free tier and simple API key configuration.
Step 2: Create a Proxy Rule Set
Navigate to your project in the BFFless admin and go to the Proxy Rules tab.
- Click Create Rule Set if you don't have one
- Give it a name like "Production Forms" or "Landing Page Rules"
- Assign the rule set to your production alias
Step 3: Add an Email Form Handler Rule
Click Add Rule and configure:
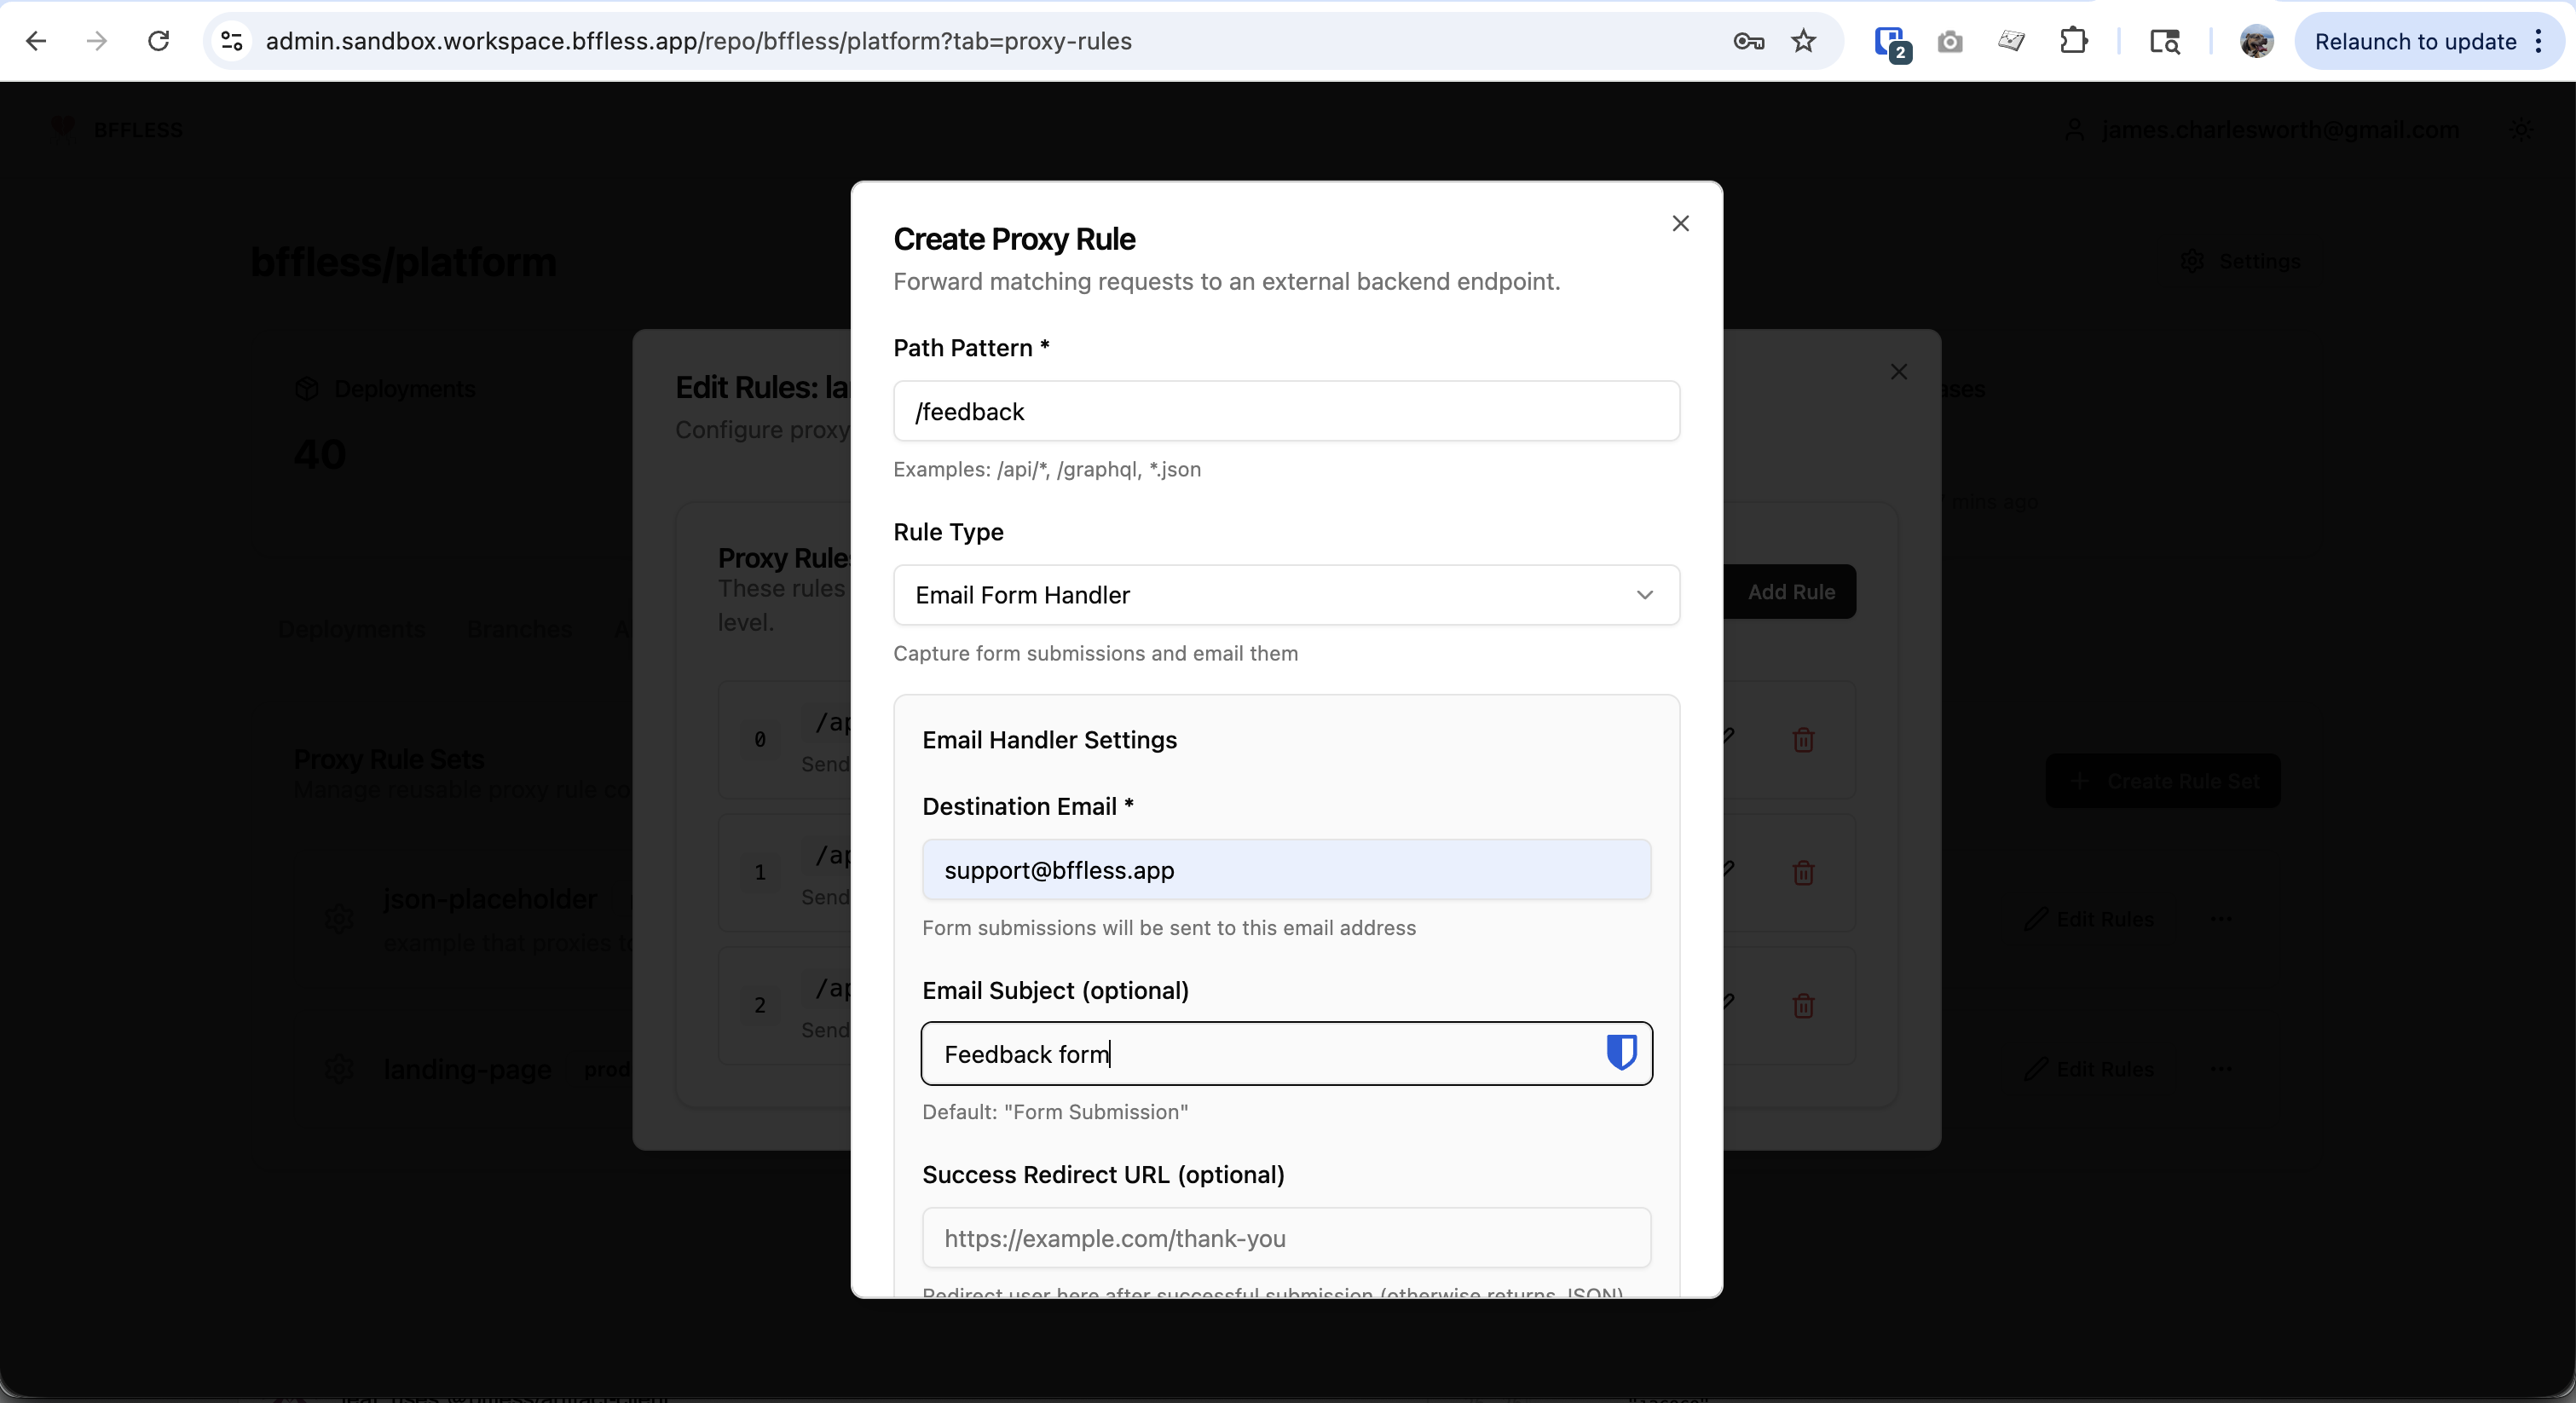
| Field | Description | Example |
|---|---|---|
| Path Pattern | The URL path that triggers the handler | /feedback |
| Rule Type | Select "Email Form Handler" | — |
| Destination Email | Where submissions are sent | support@example.com |
| Email Subject | Subject line for emails | Feedback form |
| Success Redirect URL | Redirect after submission (optional) | https://example.com/thank-you |
Advanced Options
| Field | Description | Default |
|---|---|---|
| Honeypot Field | Hidden field name for spam detection | — |
| Reply-To Field | Form field to use as reply-to address | — |
| CORS Origin | Allow cross-origin submissions | Same origin only |
| Require Auth | Only accept submissions from logged-in users | false |
Step 4: Create Your Form
Basic HTML Form
<form action="/api/contact" method="POST">
  <input type="text" name="name" placeholder="Your name" required />
  <input type="email" name="email" placeholder="Email" required />
  <textarea name="message" placeholder="Message" required></textarea>

  <!-- Honeypot field (hidden from users, traps bots) -->
  <input
    type="text"
    name="website"
    style="position: absolute; left: -9999px;"
    tabindex="-1"
    autocomplete="off"
  />

  <button type="submit">Send</button>
</form>
React/AJAX Form
For a better user experience, submit via JavaScript:
import { useState } from 'react';

interface FormData {
  name: string;
  email: string;
  message: string;
  website: string; // honeypot field
}

export default function ContactForm() {
  const [formData, setFormData] = useState<FormData>({
    name: '',
    email: '',
    message: '',
    website: '', // honeypot - should remain empty
  });
  const [isSubmitting, setIsSubmitting] = useState(false);
  const [isSubmitted, setIsSubmitted] = useState(false);
  const [error, setError] = useState<string | null>(null);

  const handleSubmit = async (e: React.FormEvent) => {
    e.preventDefault();
    setIsSubmitting(true);
    setError(null);

    try {
      const response = await fetch('/api/contact', {
        method: 'POST',
        headers: { 'Content-Type': 'application/json' },
        body: JSON.stringify(formData),
      });

      if (!response.ok) {
        throw new Error('Failed to submit form');
      }

      setIsSubmitted(true);
    } catch {
      setError('Something went wrong. Please try again.');
    } finally {
      setIsSubmitting(false);
    }
  };

  if (isSubmitted) {
    return <p>Thank you! We'll be in touch soon.</p>;
  }

  return (
    <form onSubmit={handleSubmit}>
      <input
        type="text"
        value={formData.name}
        onChange={(e) => setFormData({ ...formData, name: e.target.value })}
        placeholder="Your name"
        required
      />
      <input
        type="email"
        value={formData.email}
        onChange={(e) => setFormData({ ...formData, email: e.target.value })}
        placeholder="Email"
        required
      />
      <textarea
        value={formData.message}
        onChange={(e) => setFormData({ ...formData, message: e.target.value })}
        placeholder="Message"
        required
      />

      {/* Honeypot - hidden from users */}
      <input
        type="text"
        name="website"
        value={formData.website}
        onChange={(e) => setFormData({ ...formData, website: e.target.value })}
        style={{ position: 'absolute', left: '-9999px' }}
        tabIndex={-1}
        autoComplete="off"
        aria-hidden="true"
      />

      {error && <p className="error">{error}</p>}

      <button type="submit" disabled={isSubmitting}>
        {isSubmitting ? 'Sending...' : 'Send Message'}
      </button>
    </form>
  );
}
Email Format
Submissions arrive as nicely formatted HTML emails:
Subject: Contact Form Submission

Form Submission
---------------

Name: Jane Developer
Email: jane@example.com
Message: I'd love to learn more about your product...

---
Submitted at: 2026-02-24T14:30:00Z
Origin: https://example.com
User Agent: Mozilla/5.0...
If you configure the Reply-To Field as email, clicking "Reply" in your email client will address the response to the submitter.
Security Features
Honeypot Spam Protection
A honeypot is a hidden form field that legitimate users won't see or fill out, but spam bots will. When the honeypot field contains a value, the submission is silently rejected.
<!-- Hidden from users via CSS -->
<input
  type="text"
  name="website"
  style="position: absolute; left: -9999px;"
  tabindex="-1"
  autocomplete="off"
/>
Configure the honeypot field name in your proxy rule settings to enable this protection.
Rate Limiting
BFFless enforces a limit of 10 submissions per IP address per hour. This prevents abuse without affecting legitimate users. If the limit is exceeded, a 429 Too Many Requests response is returned.
Input Sanitization
All form data is HTML-escaped before being included in emails, preventing XSS attacks in email clients.
Authentication (Optional)
For internal tools or logged-in user feedback, enable Require Auth to only accept submissions from users with a valid session. The submitter's email and user ID will be included in the email.
Path Pattern Examples
| Pattern | Matches |
|---|---|
/contact | Exactly /contact |
/api/forms/* | /api/forms/contact, /api/forms/support |
/*/submit | /contact/submit, /feedback/submit |
Troubleshooting
"Email service not configured"
You'll see a 503 Service Unavailable response if email isn't configured. Go to Settings > Email to set up an email provider.
Form submissions not arriving
- Check that your proxy rule is enabled
- Verify the rule set is assigned to the correct alias
- Check the destination email isn't filtering BFFless as spam
- Confirm you're using POST method (GET is not supported)
CORS errors
If your form is on a different domain than your BFFless deployment, configure the CORS Origin setting to allow cross-origin requests.
Tips
Multiple Forms, One Rule Set
Create multiple email form handler rules within the same rule set for different purposes:
| Path | Destination | Use Case |
|---|---|---|
/api/contact | support@example.com | General inquiries |
/api/sales | sales@example.com | Sales leads |
/api/feedback | product@example.com | Product feedback |
Custom Subject Lines
Use descriptive subject lines to help with email filtering:
- "Contact Form: New inquiry"
- "Sales Lead: Enterprise interest"
- "Bug Report: From landing page"
Redirect vs JSON Response
- Redirect: Best for traditional HTML forms — sends users to a thank-you page
- JSON: Best for JavaScript/AJAX forms — returns
{ "success": true }for custom handling
Include a Source Field
Add a hidden source field to track where submissions come from:
<input type="hidden" name="source" value="landing-page-hero" />
This appears in the email and helps you understand which forms drive the most engagement.
Response Codes
| Code | Meaning |
|---|---|
200 OK | Submission accepted, JSON response |
303 See Other | Submission accepted, redirect to success URL |
400 Bad Request | Invalid form data |
405 Method Not Allowed | Only POST is supported |
429 Too Many Requests | Rate limit exceeded |
503 Service Unavailable | Email service not configured |