Server-Side State
This recipe demonstrates how to use BFFless Data Tables (DB Records) as a server-side key-value store for application state. You'll learn how to persist state across requests, create GET/POST API endpoints, and use Custom Functions for state transformations.
Overview
Using DB Records as a state store provides:
- Persistent storage - State survives page refreshes and server restarts
- No backend code - Build stateful APIs visually with Pipelines
- JSON flexibility - Store complex objects in a single field
- Audit trail - Track when state was last updated via timestamps
This pattern is perfect for counters, feature flags, user preferences, and any server-persisted state on static sites.
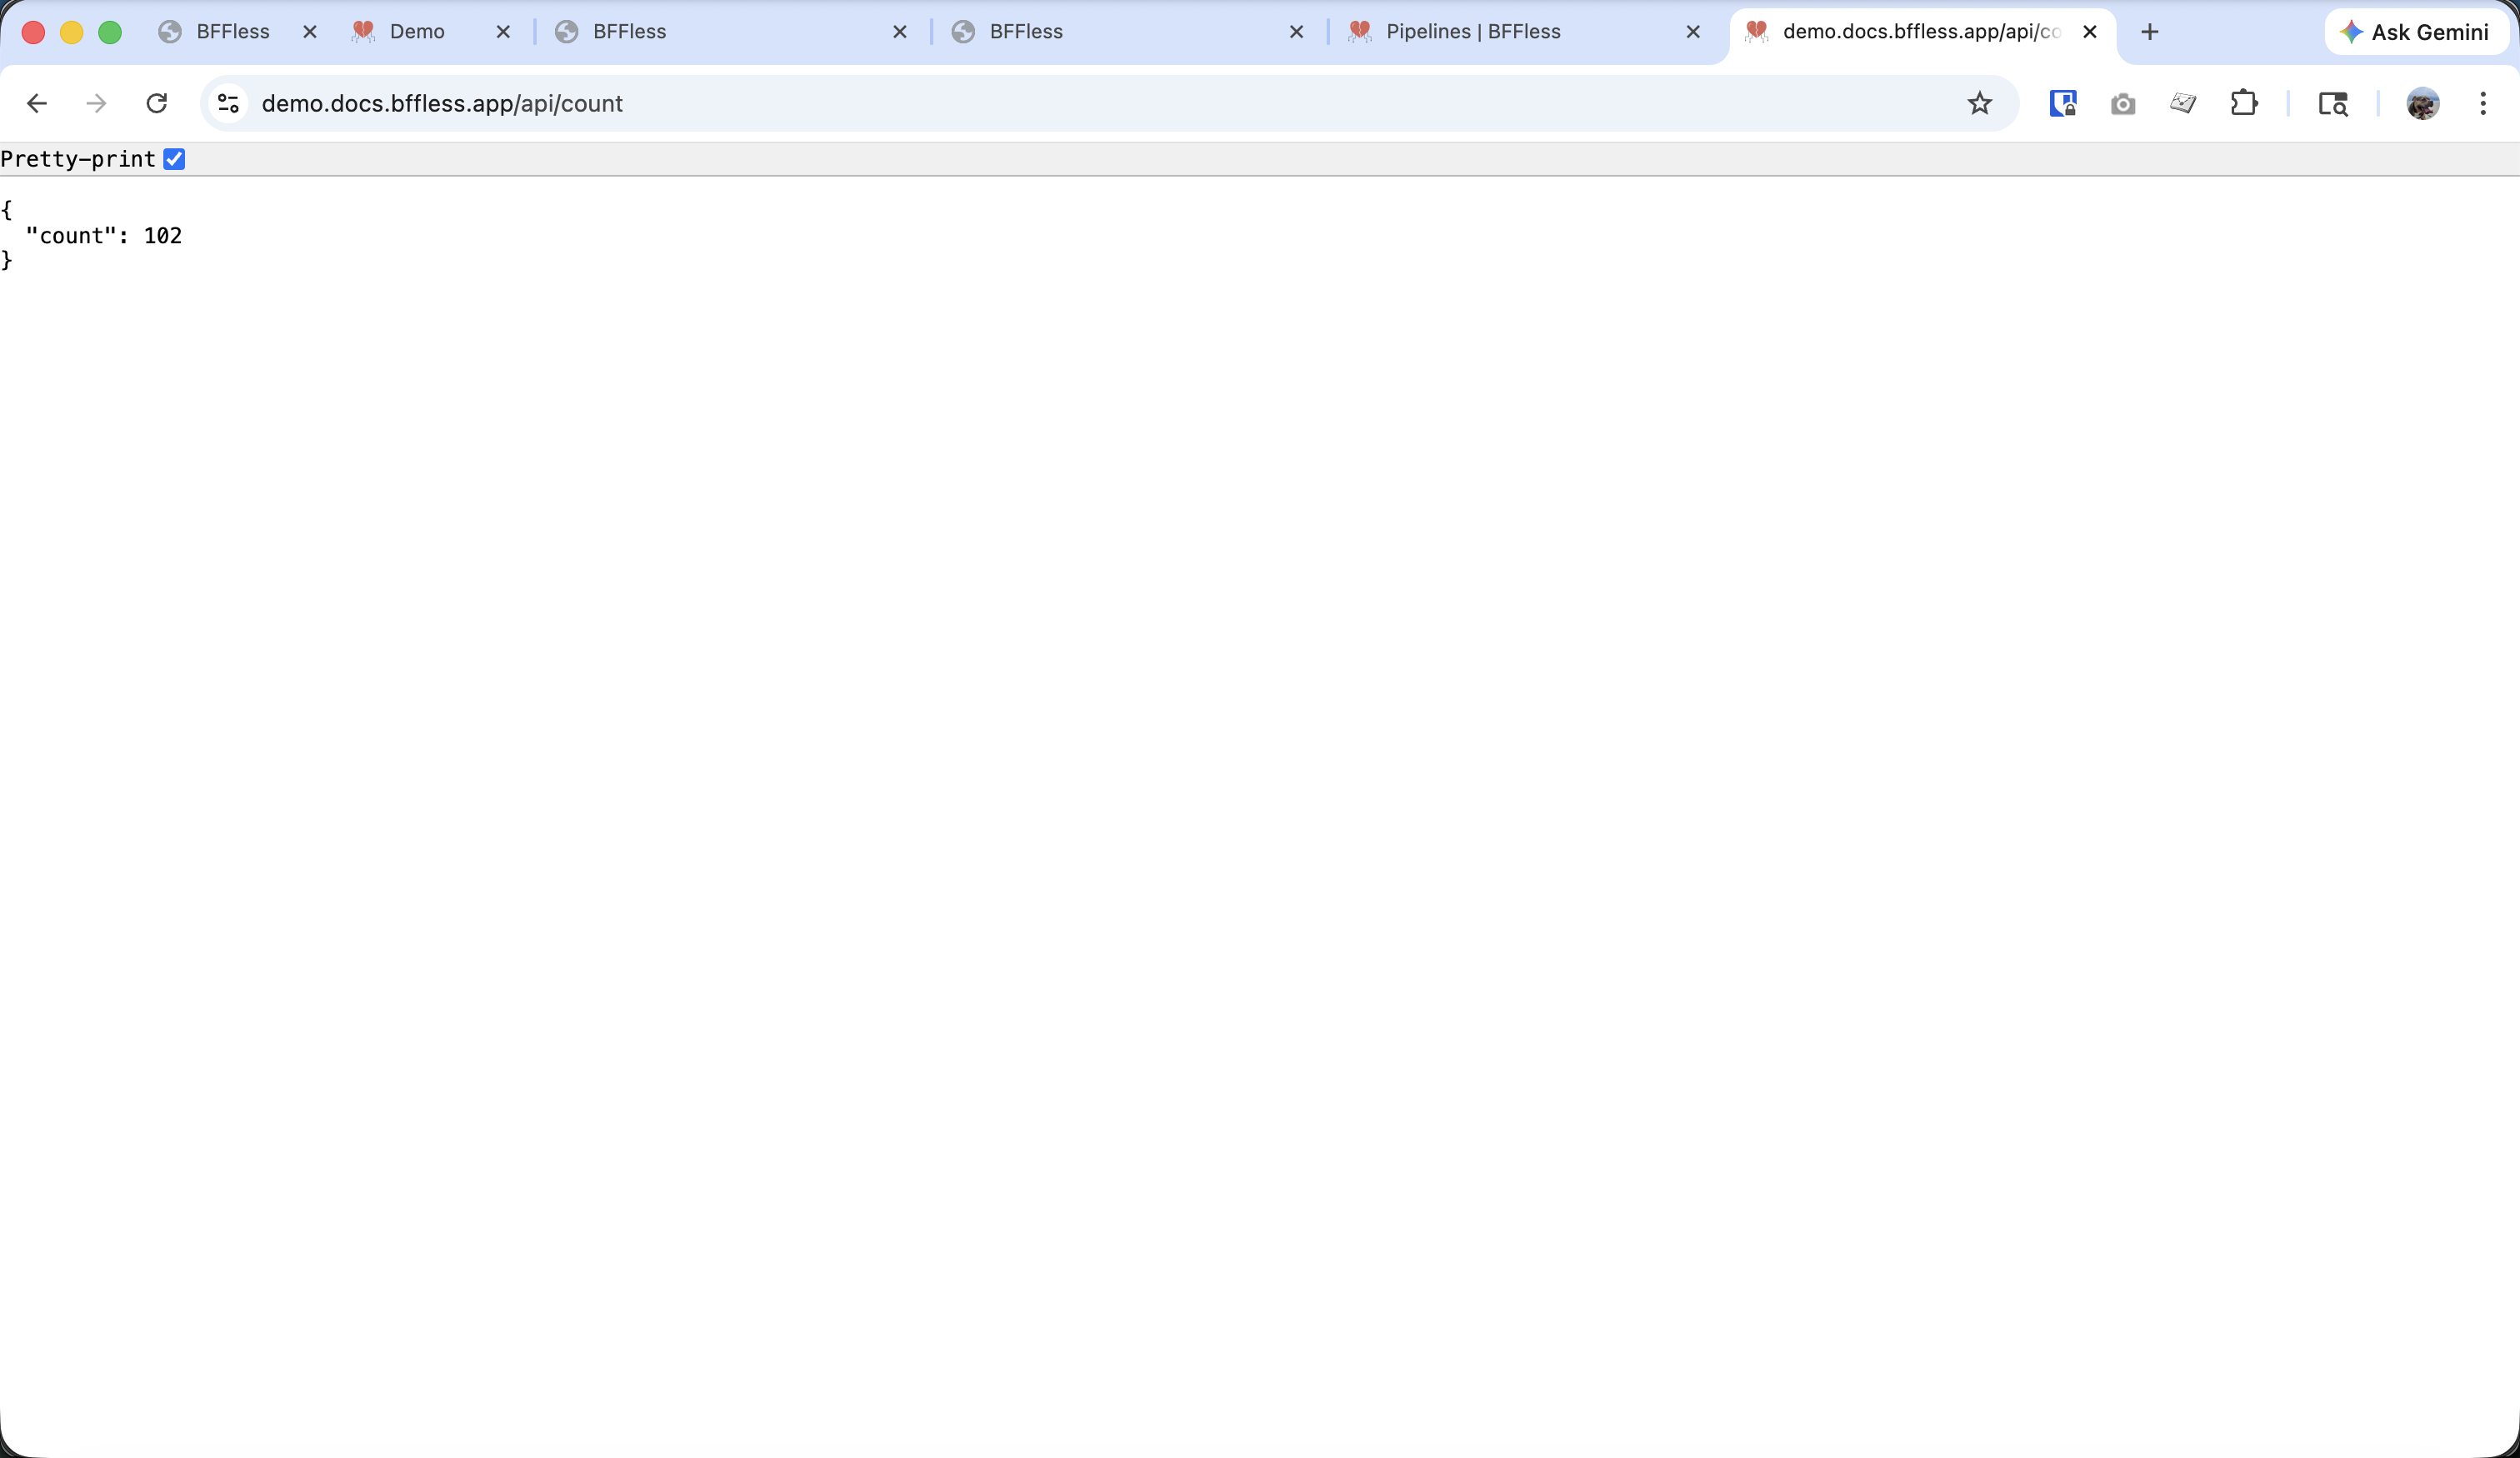
Live Example
We have a click counter demo running on demo.docs.bffless.app. The counter state is stored in a DB Record and accessed via Pipeline API endpoints:
- GET
/api/count- Returns the current count - POST
/api/count- Increments and returns the updated count
Try it yourself—open the demo in multiple browser tabs and watch the count sync across all of them.
Step 1: Create the Data Schema
First, create a DB Record to serve as your key-value store.
- Navigate to your project in the BFFless admin
- Go to Pipelines → DB Records tab
- Click Create DB Record
- Name it
keystore - Add the following fields:
| Field | Type | Required | Description |
|---|---|---|---|
key | String | Yes | Identifier for the state value |
value | JSON | Yes | The state data (any JSON structure) |
updated_at | Date | Yes | Last update timestamp |
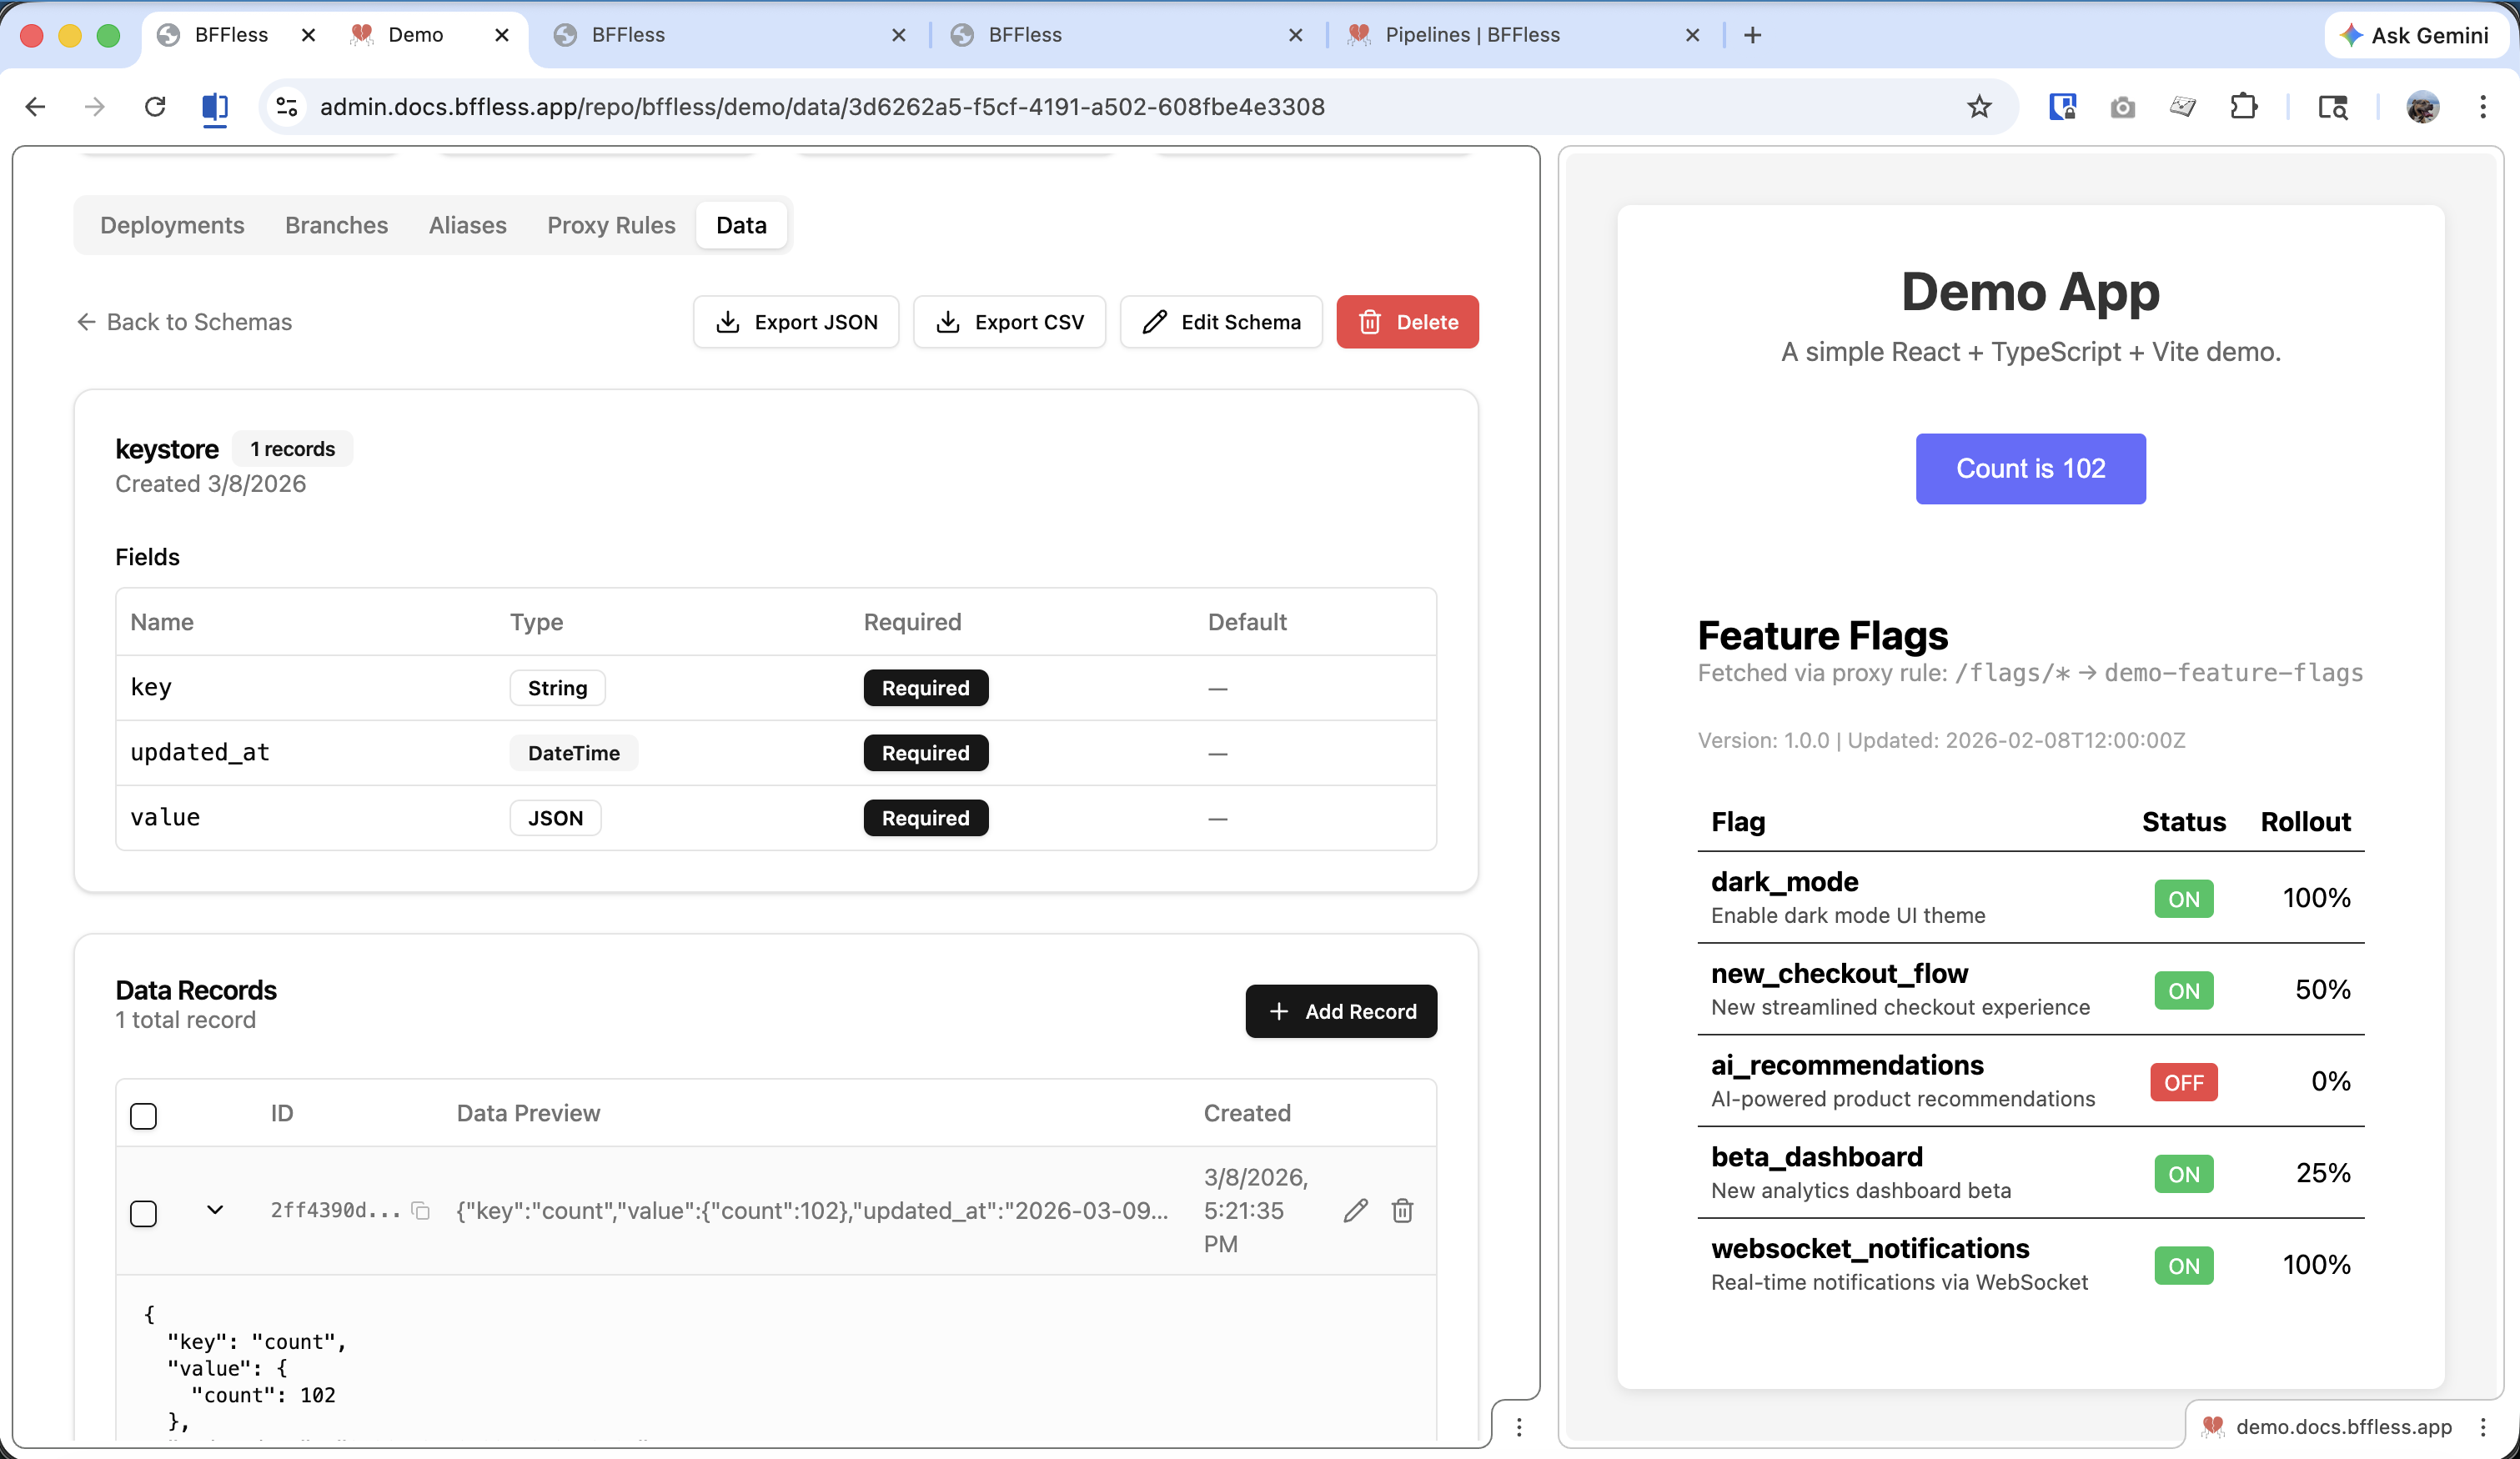
After creating the schema, add an initial record:
- Click into the
keystoreDB Record - Click Add Record
- Set:
key:"click_count"value:{"count": 0}updated_at: current date/time
Note the Record ID (UUID) that's generated—you'll need this for the pipeline configuration.
Step 2: Create the GET Pipeline
Create a Pipeline to read the current count.
- Go to Pipelines → Pipelines tab
- Click Create Pipeline
- Configure the basic settings:
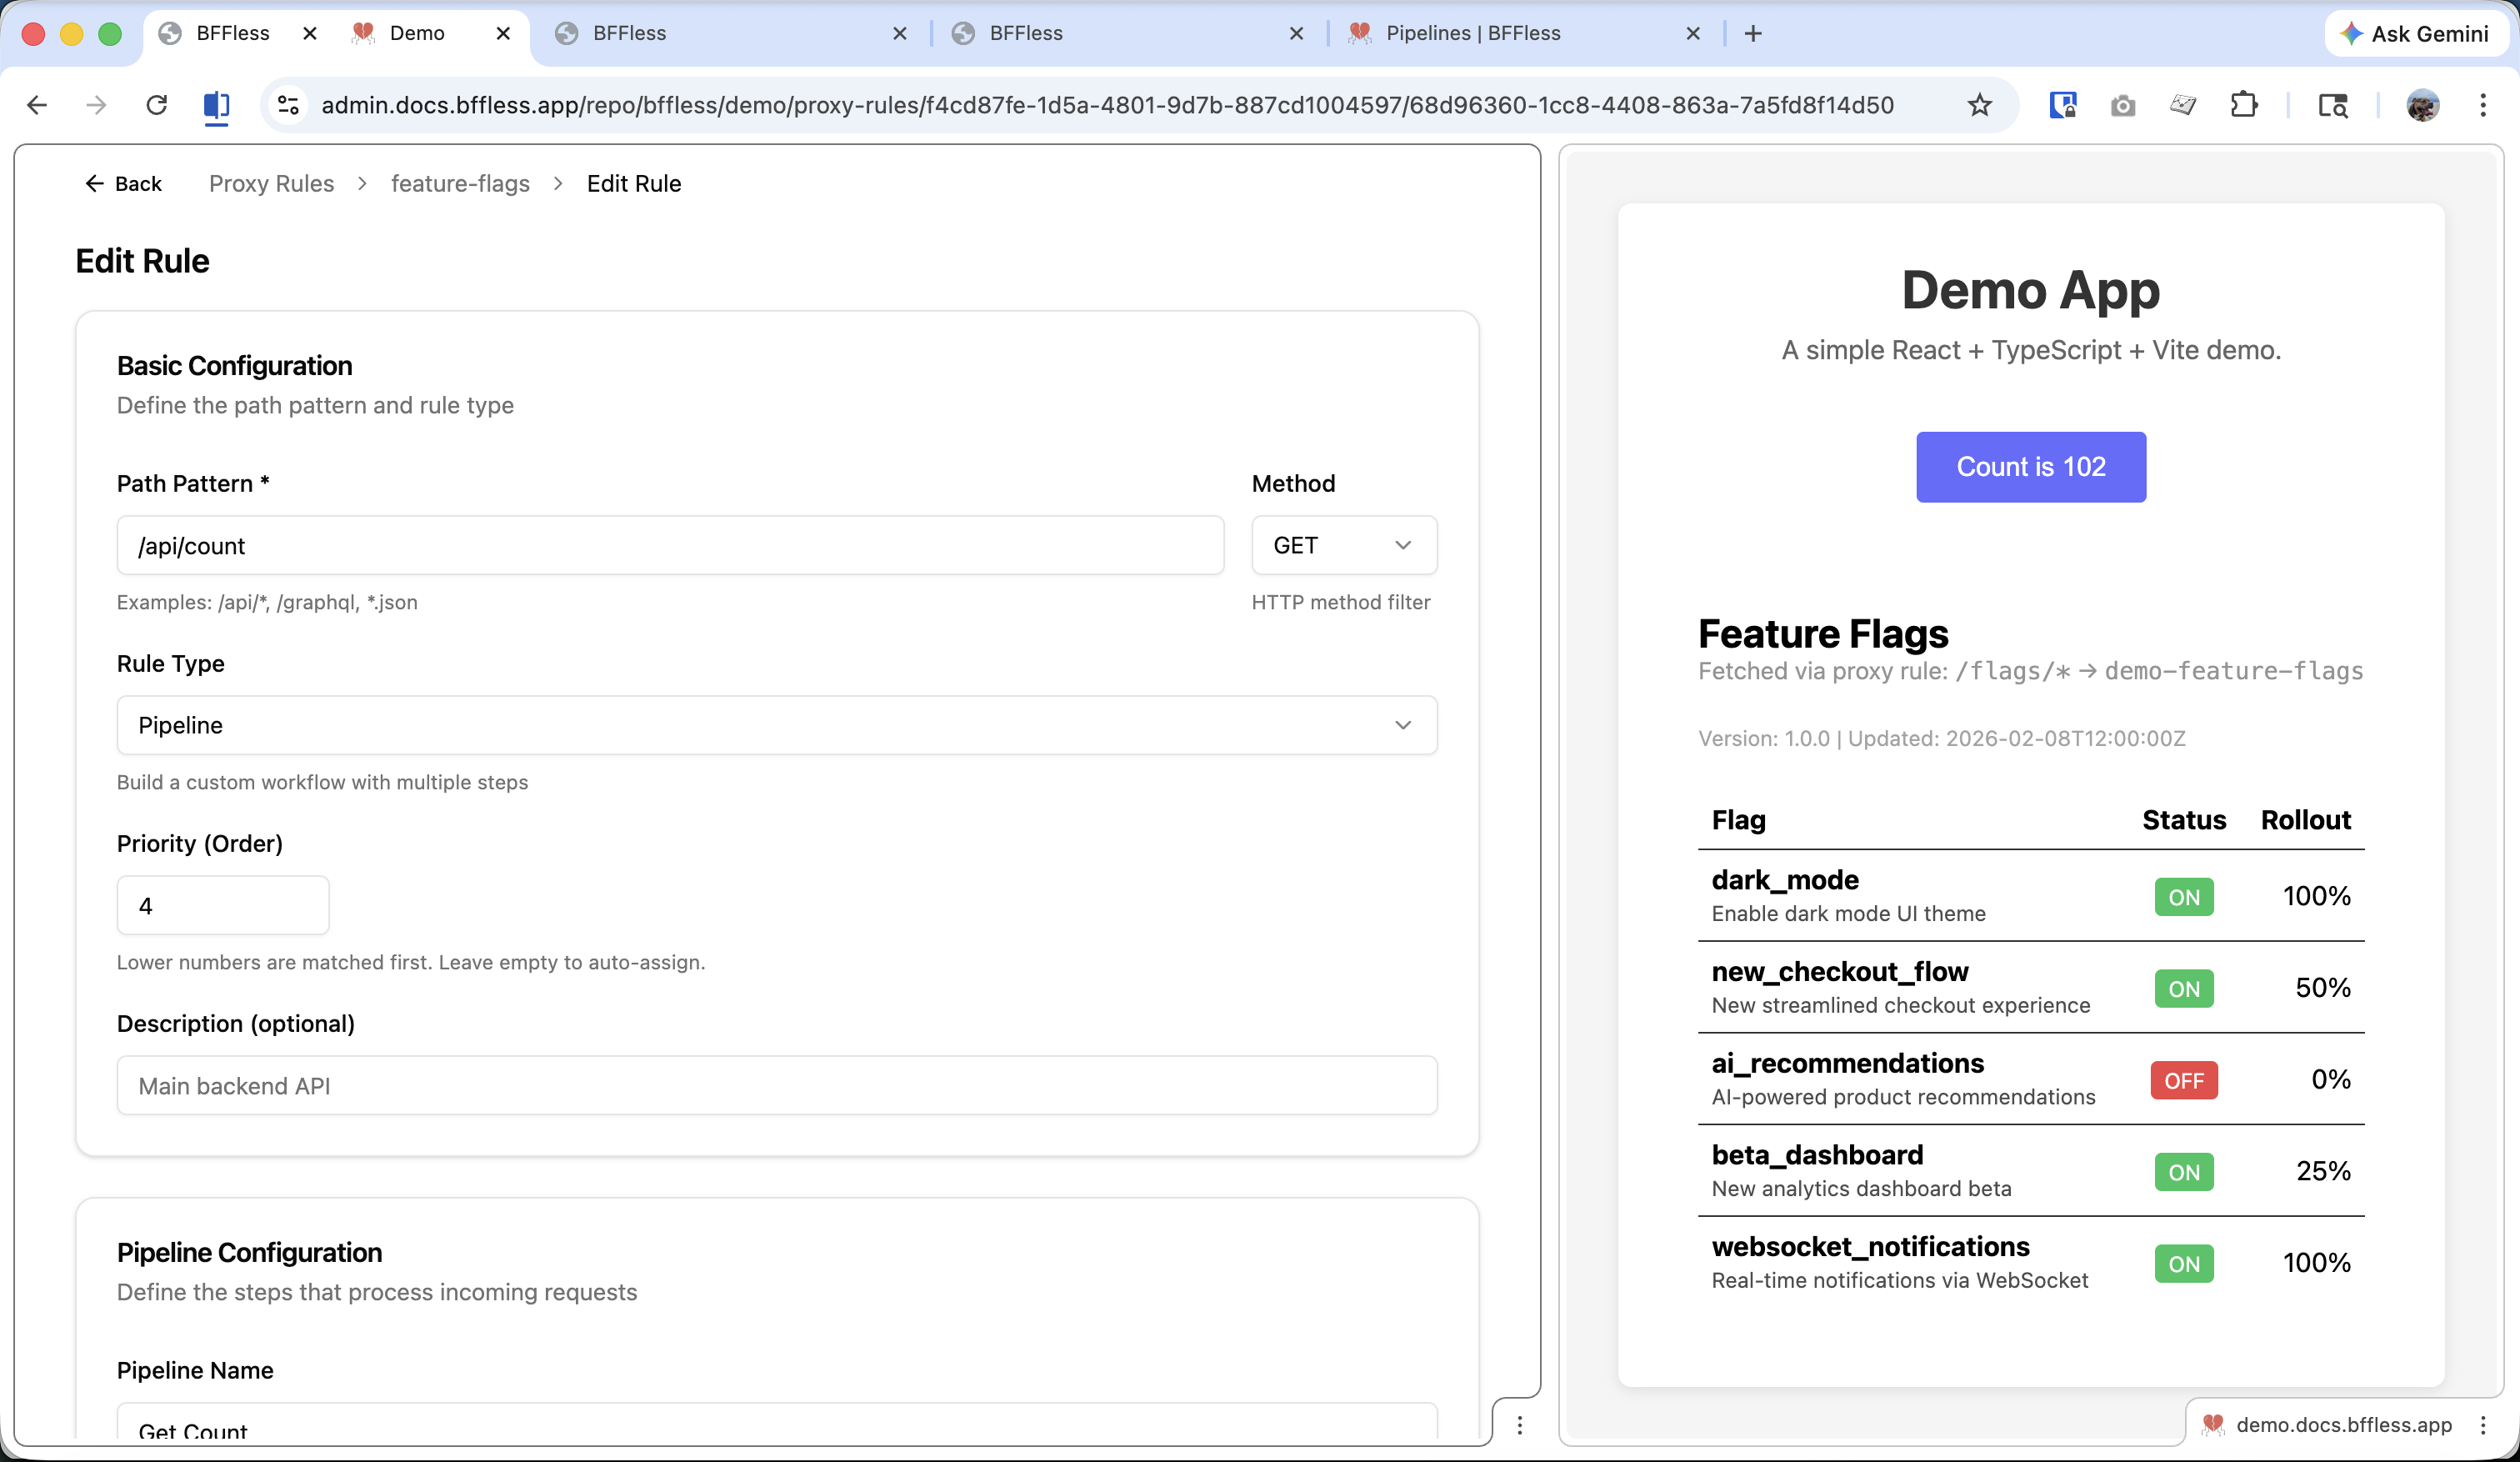
| Setting | Value |
|---|---|
| Name | get-count |
| Path | /api/count |
| Method | GET |
| Rule Type | Pipeline |
Add Handler 1: Query Records
Add a Data Query handler to fetch the current state:

| Setting | Value |
|---|---|
| Handler Type | Data Query |
| Source Schema | keystore |
| Record ID | The UUID of your click_count record |
| Return Single Object | Enabled |
Name this step getCount so you can reference it in later steps.

Add Terminal Handler: HTTP Response
Add a Response Handler to return the count:
| Setting | Value |
|---|---|
| Handler Type | Response |
| Status | 200 OK |
| Body | { "count": {{steps.getCount.value.count}} } |
The expression {{steps.getCount.value.count}} references the value.count field from the query result.
Step 3: Create the POST Pipeline
Create a Pipeline to increment and update the count.
- Click Create Pipeline
- Configure the basic settings:
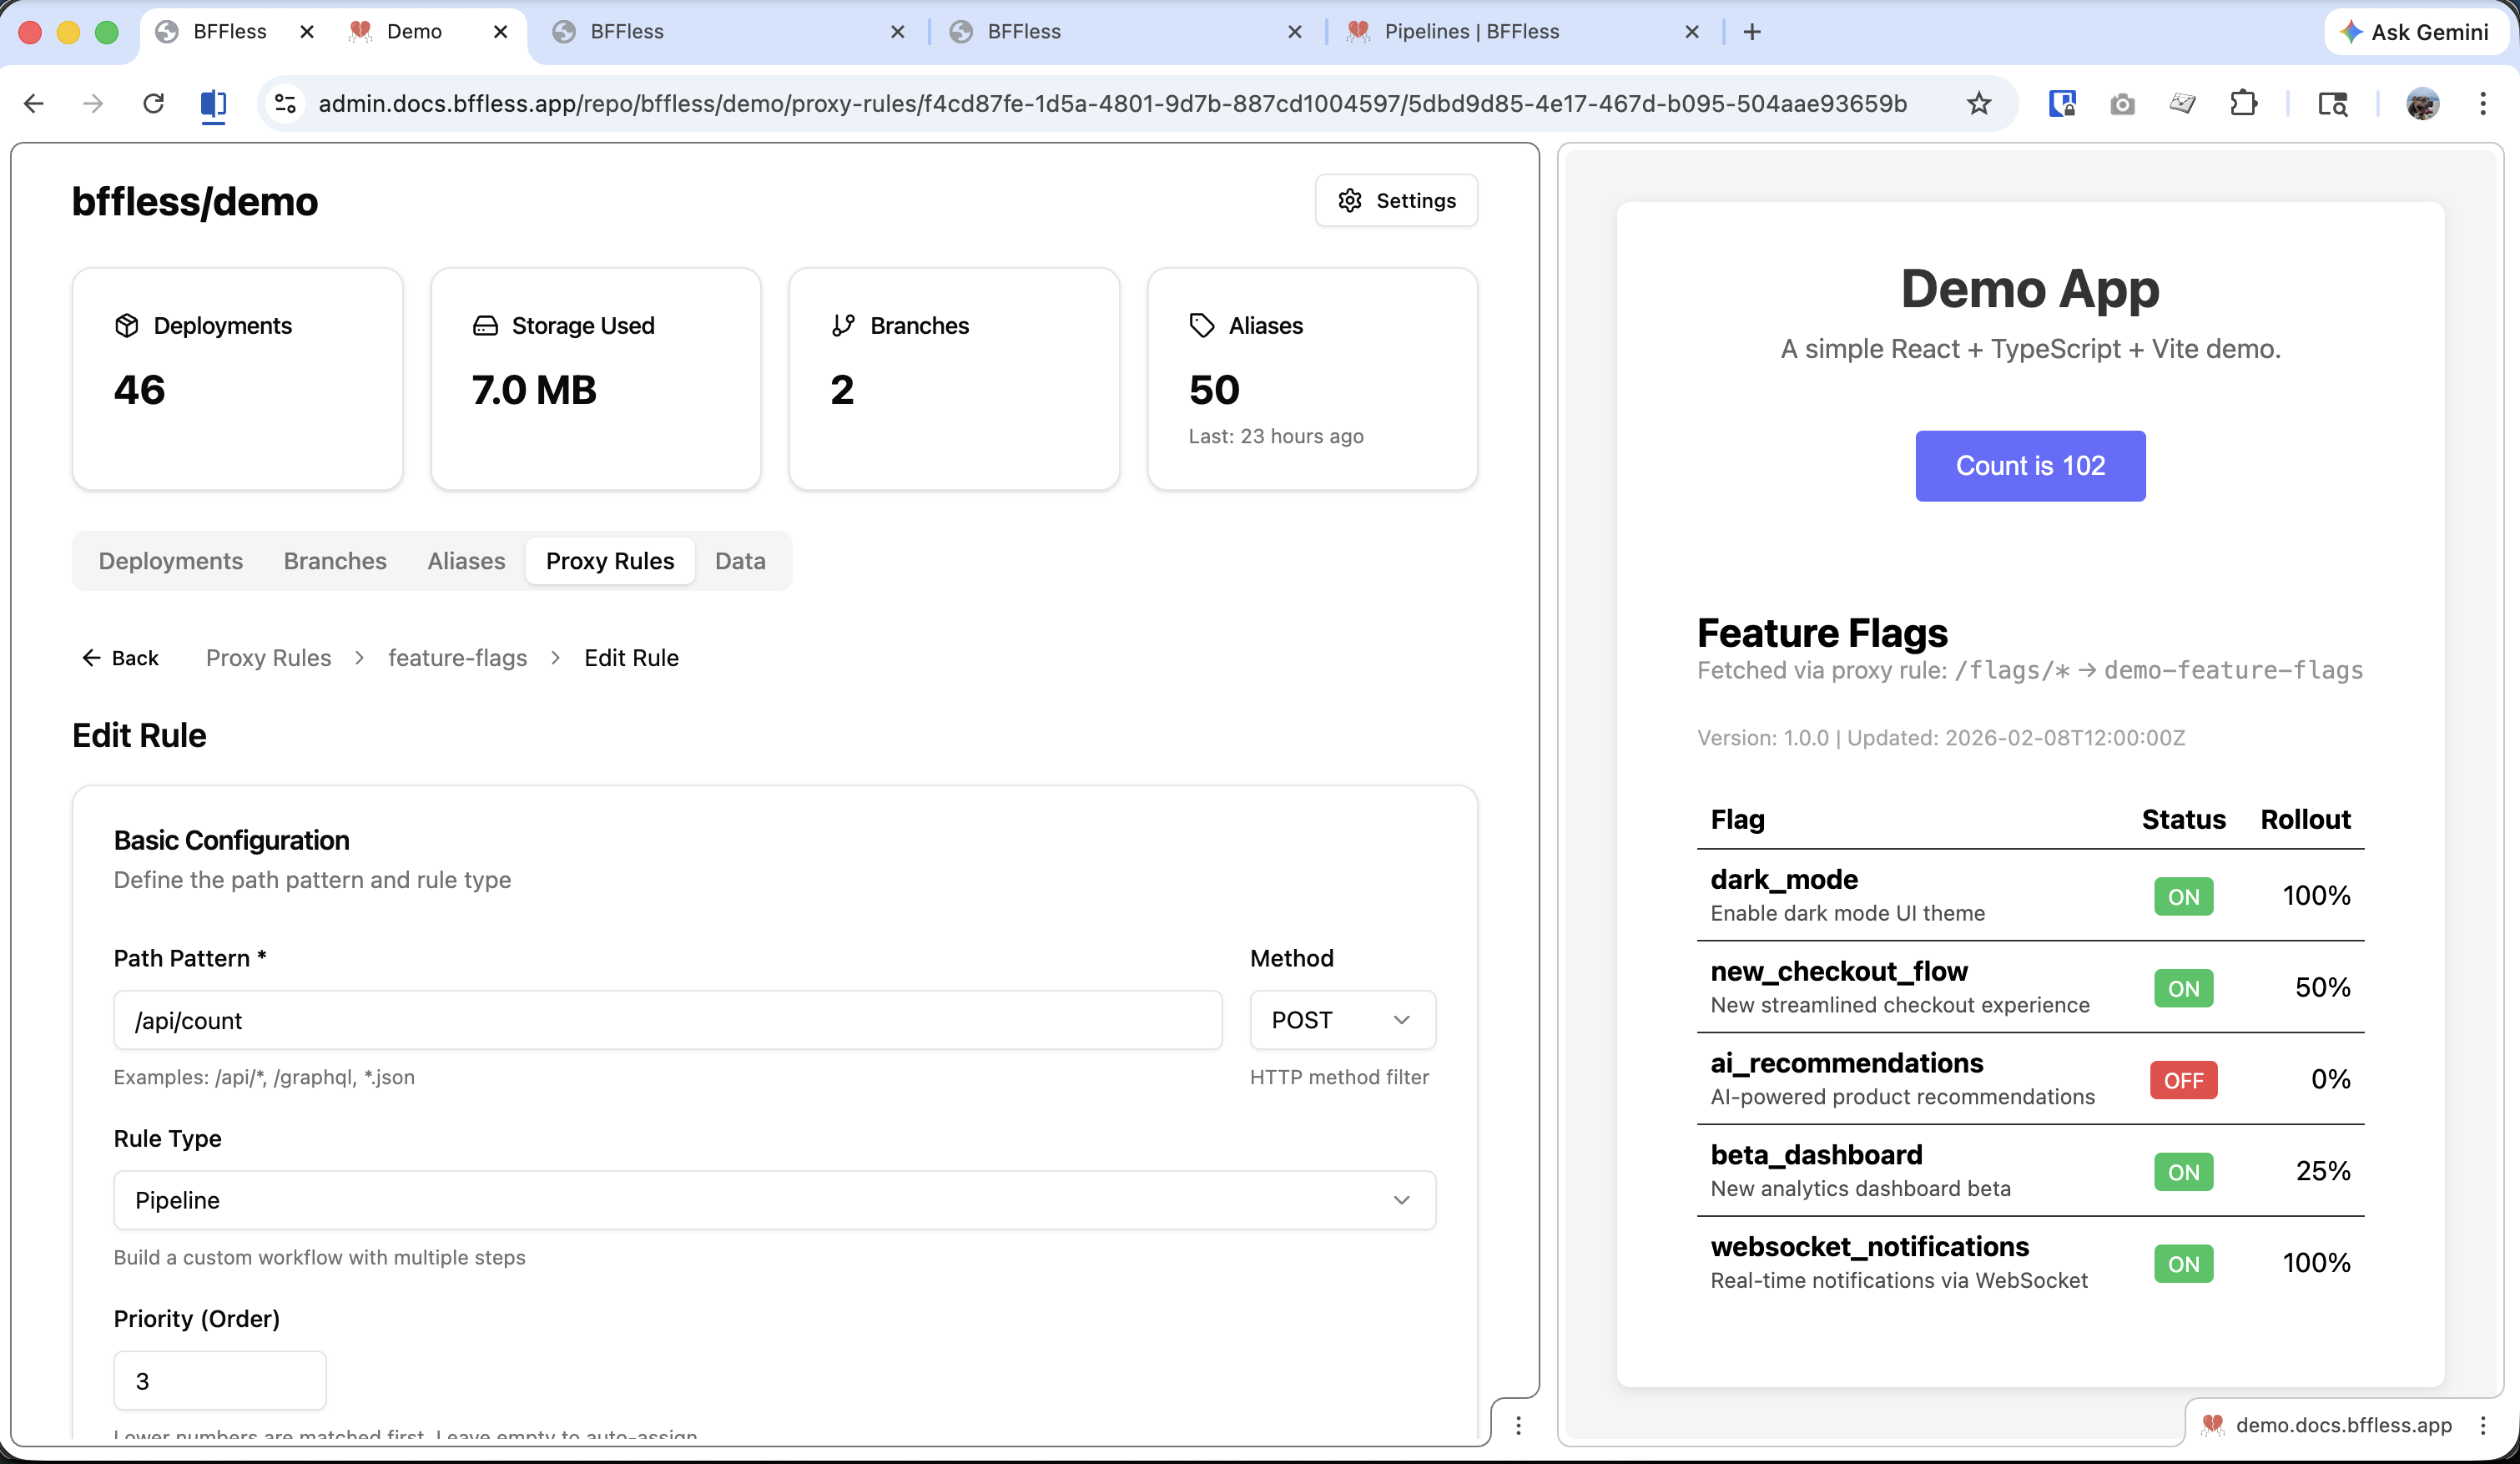
| Setting | Value |
|---|---|
| Name | update-count |
| Path | /api/count |
| Method | POST |
| Rule Type | Pipeline |
Add Handler 1: Query Records
First, fetch the current count (same as the GET pipeline):
| Setting | Value |
|---|---|
| Handler Type | Data Query |
| Source Schema | keystore |
| Record ID | The UUID of your click_count record |
| Return Single Object | Enabled |
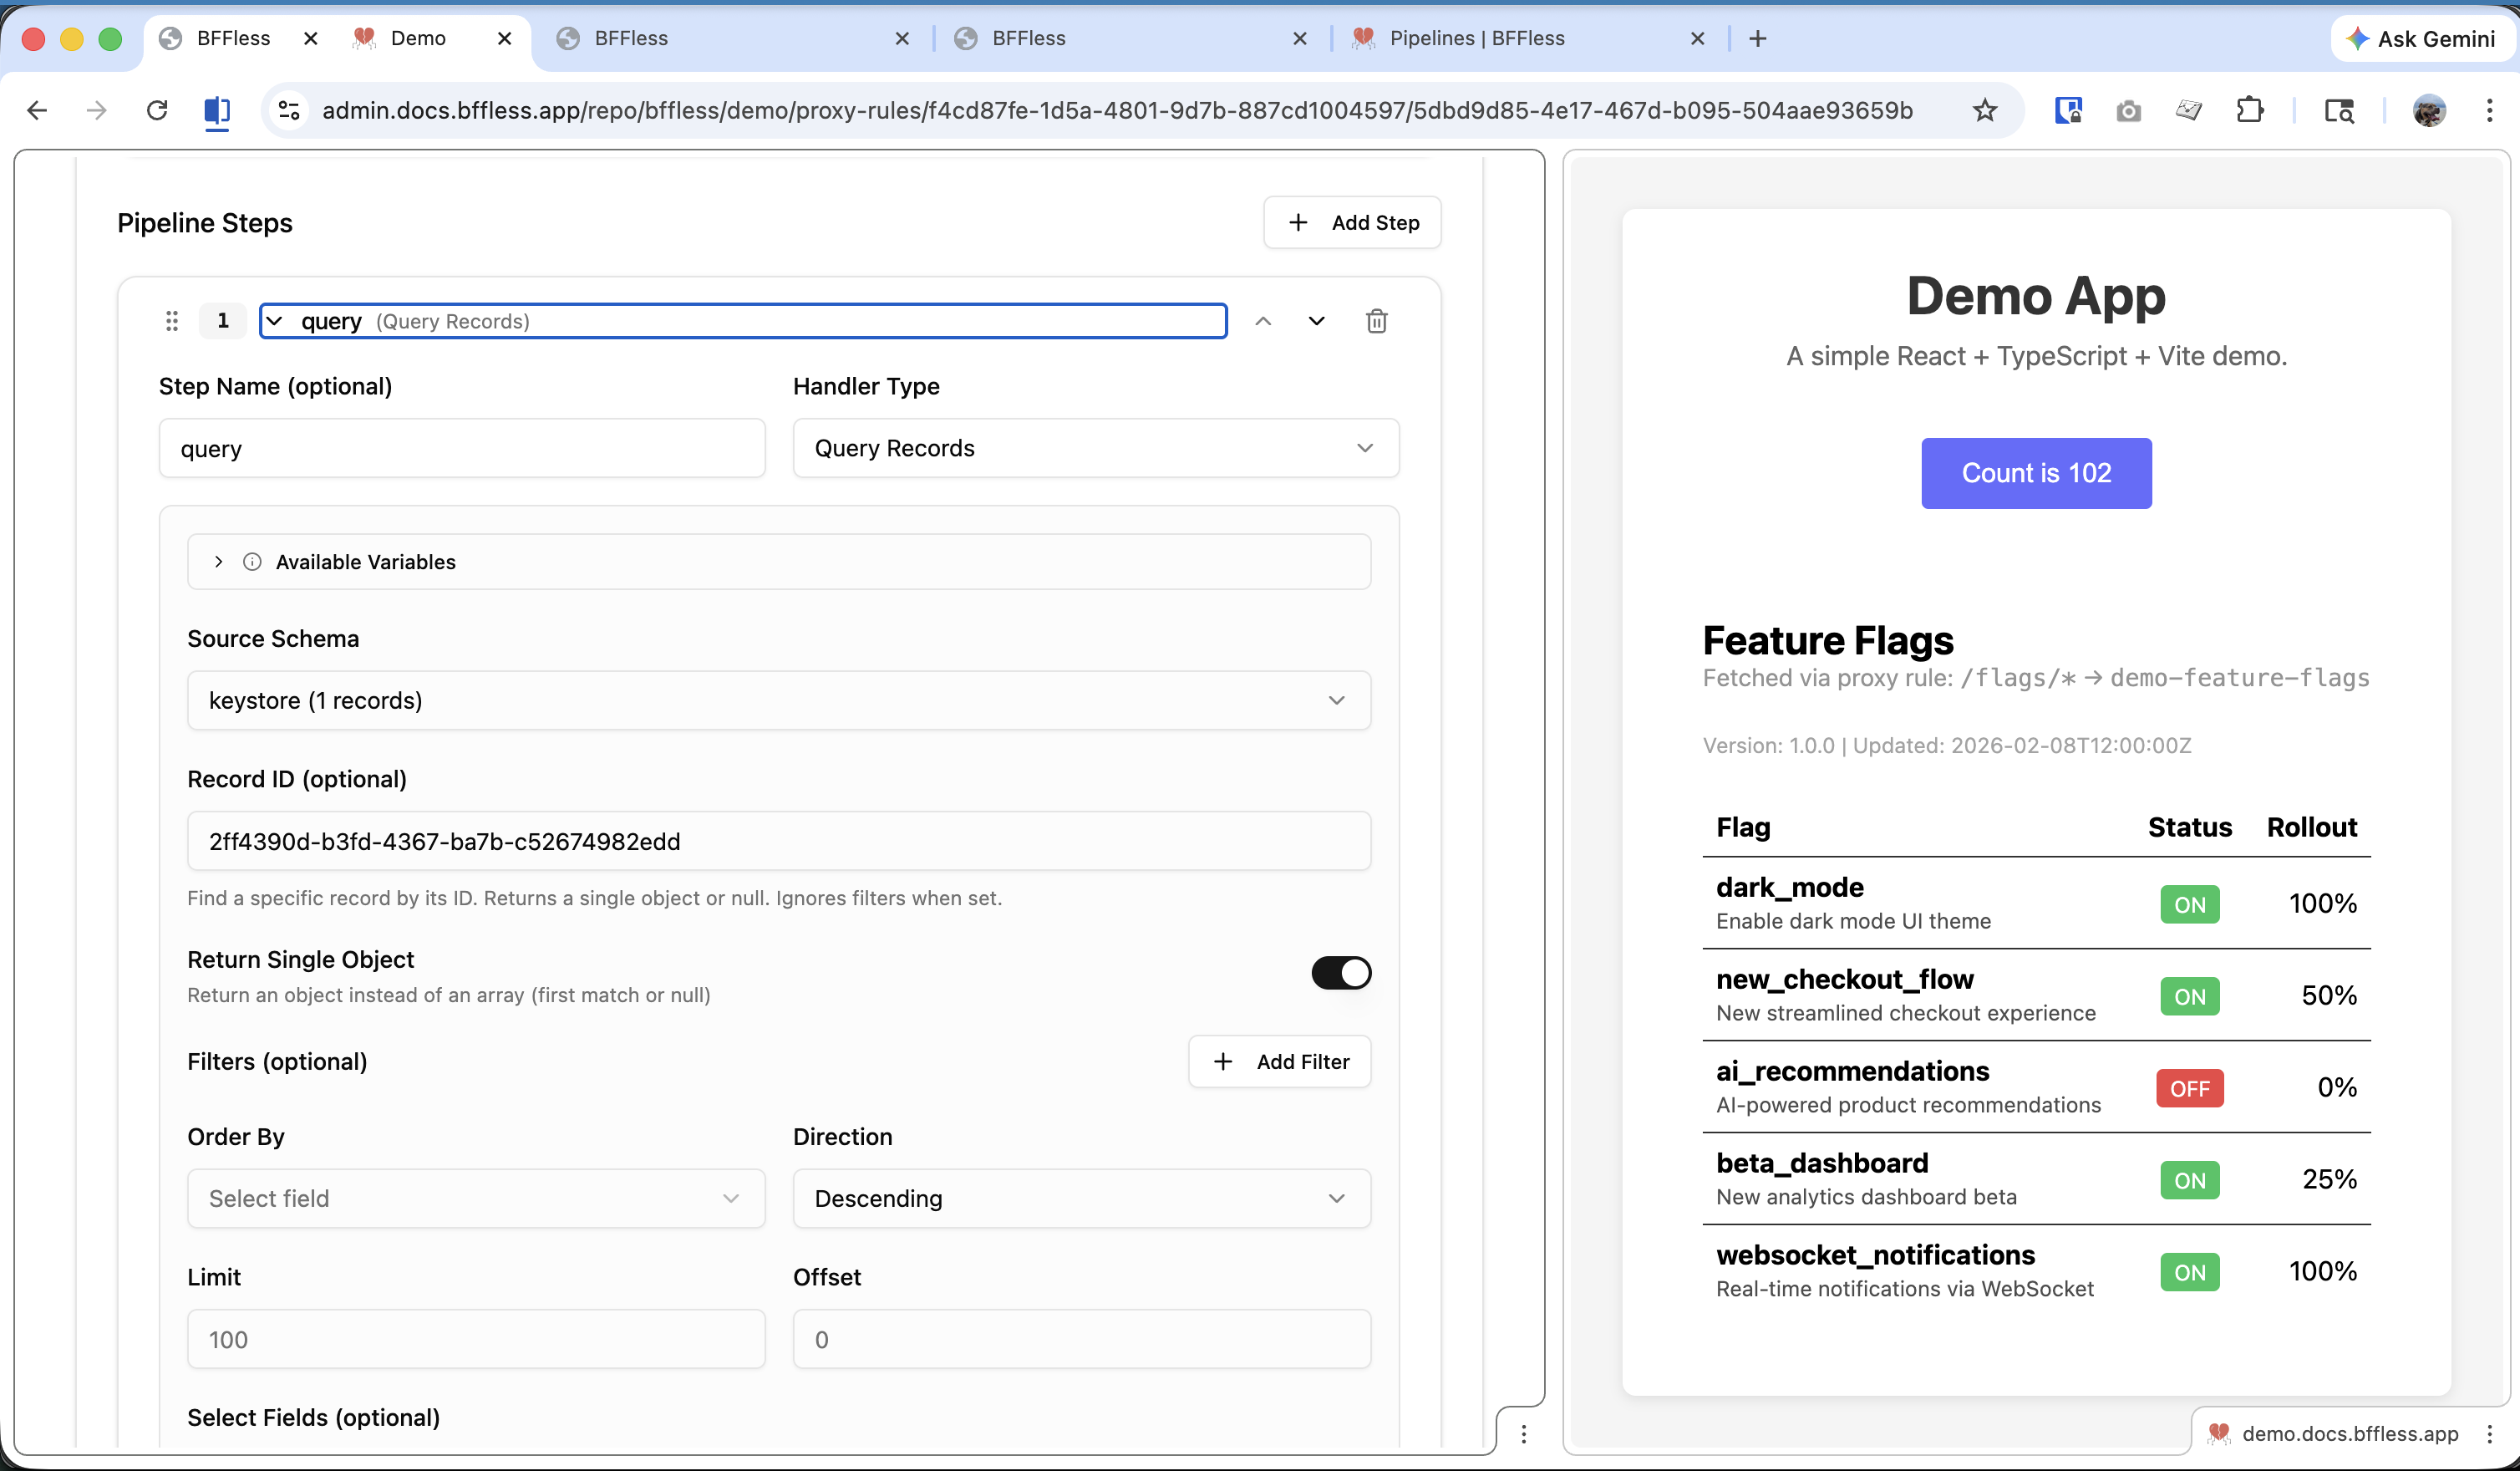
Name this step query.
Add Handler 2: Custom Function
Add a Function Handler to increment the count:
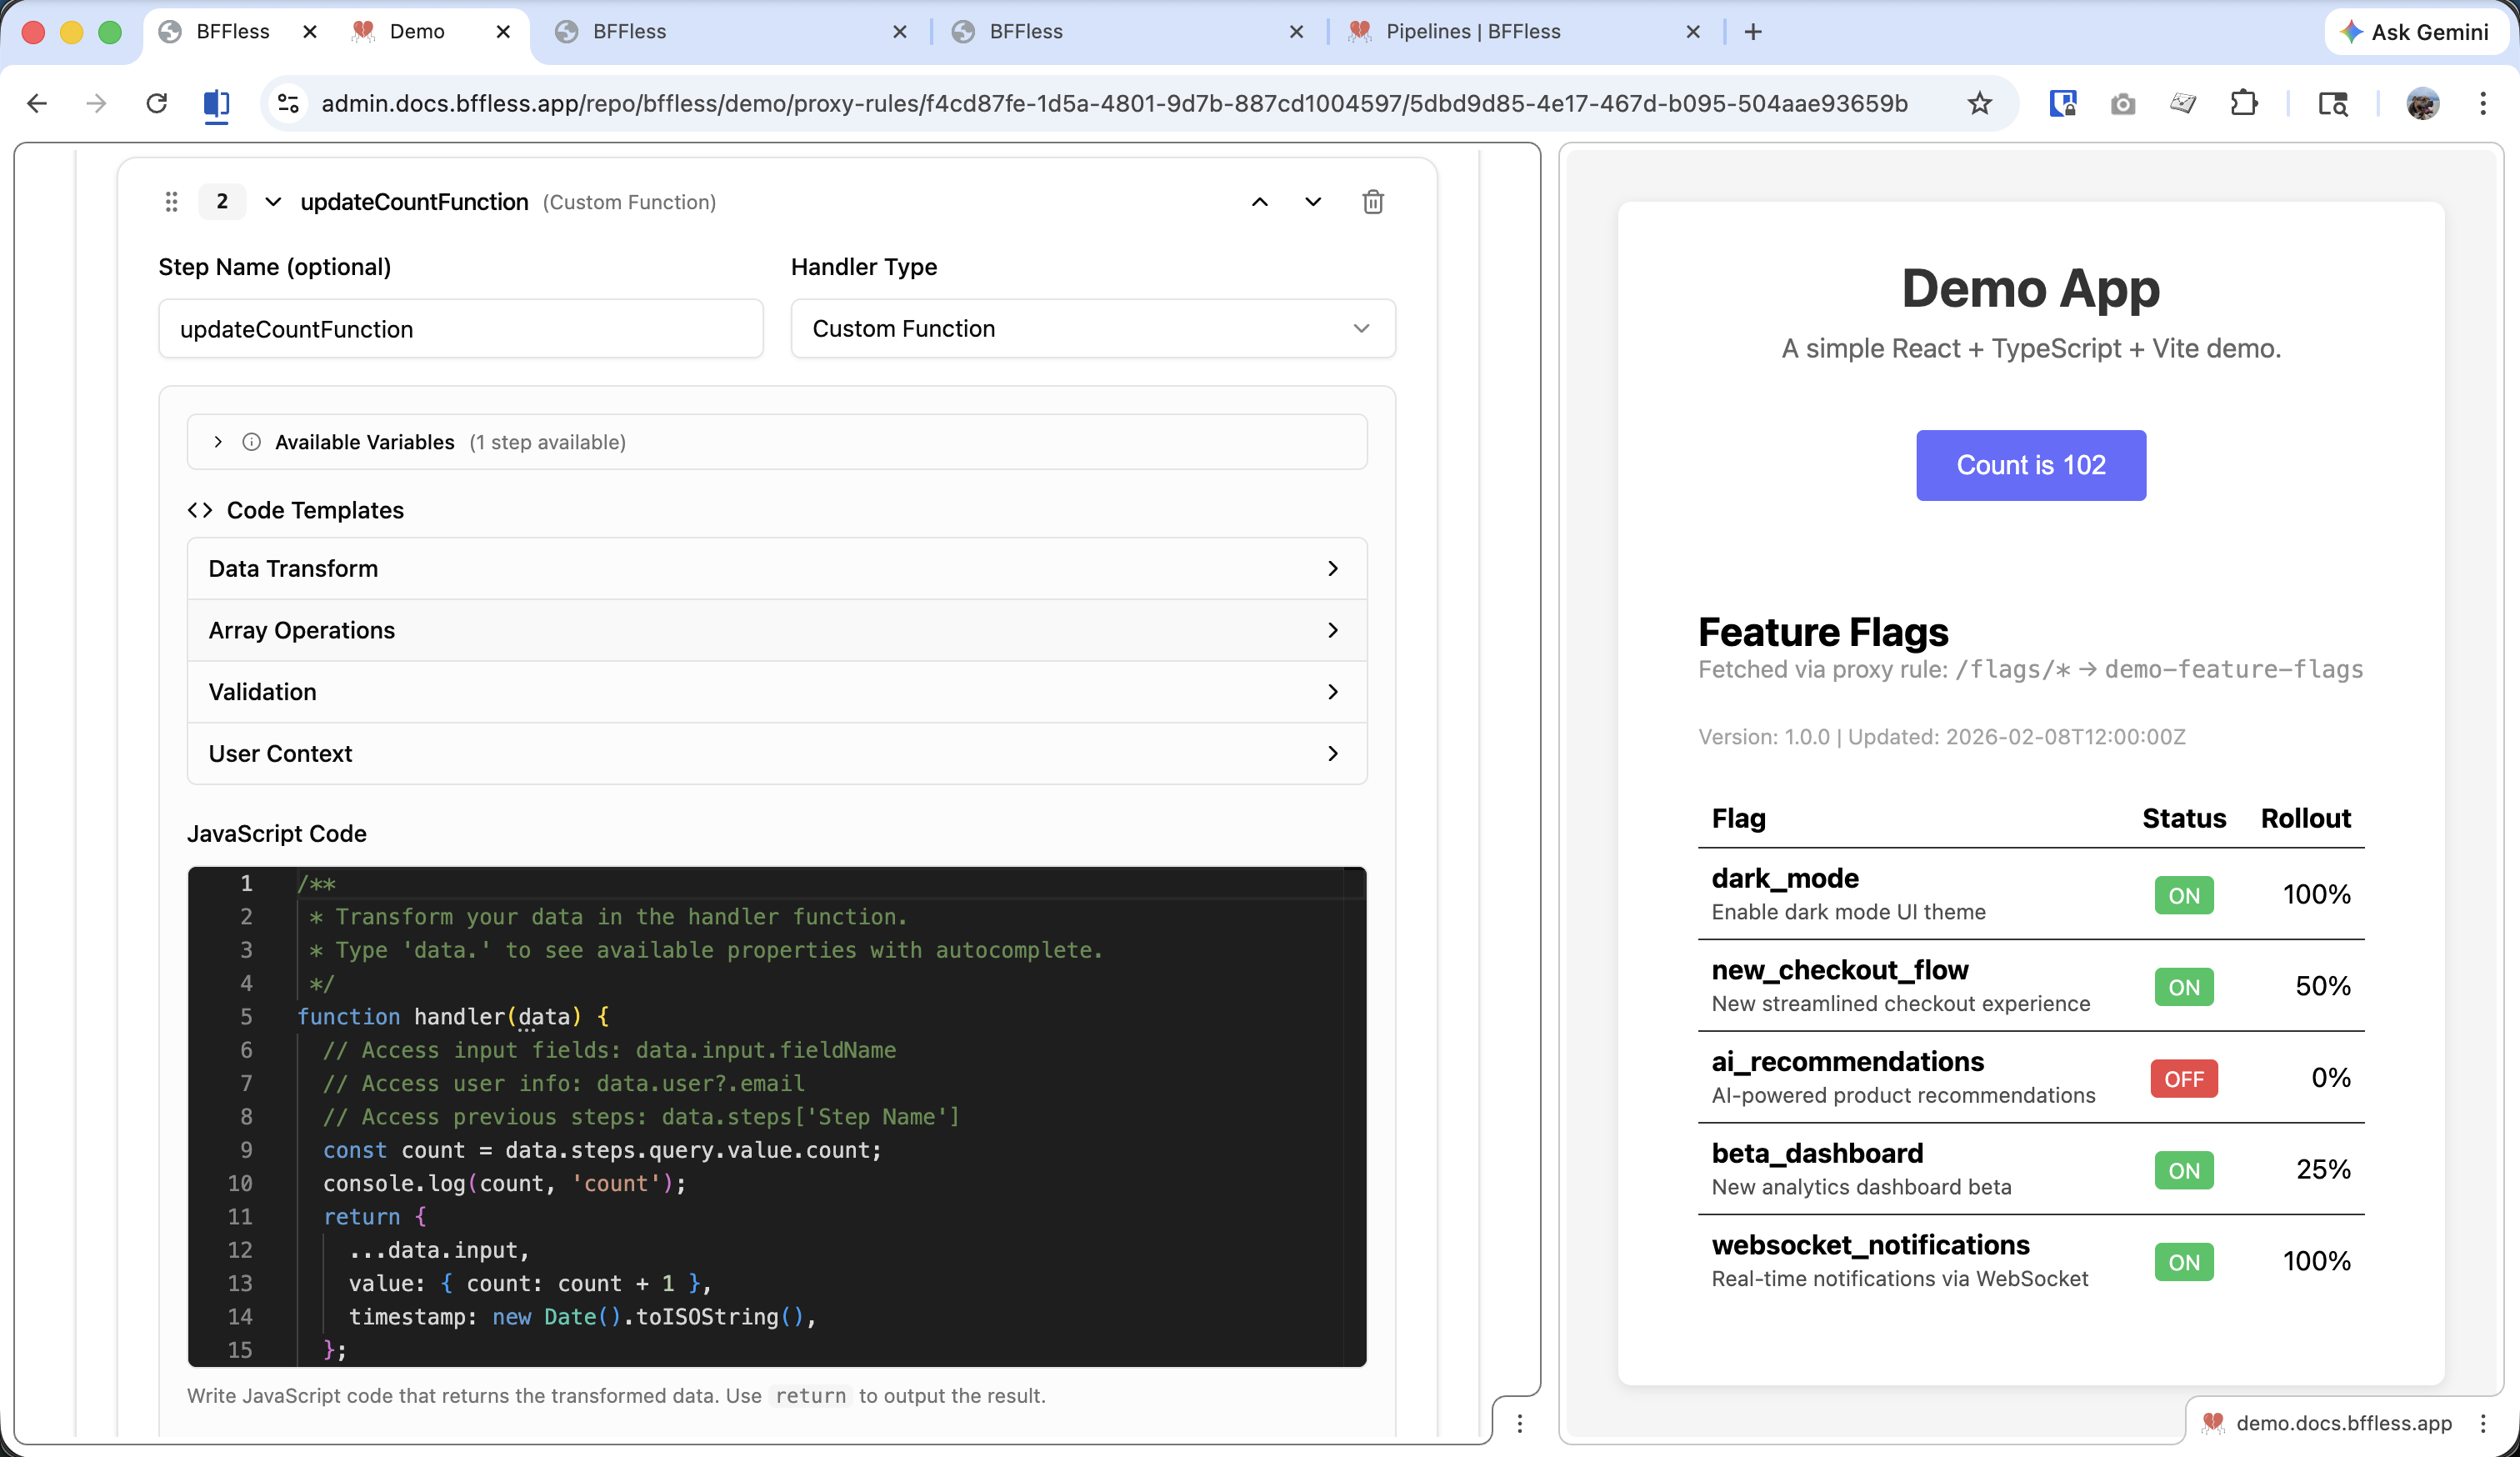
const count = data.steps.query.value.count;
return {
  ...data.input,
  value: { count: count + 1 },
  timestamp: new Date().toISOString(),
};
This function:
- Reads the current count from the query step
- Returns a new
valueobject with the incremented count - Includes a
timestampfor theupdated_atfield
Name this step updateCountFunction.
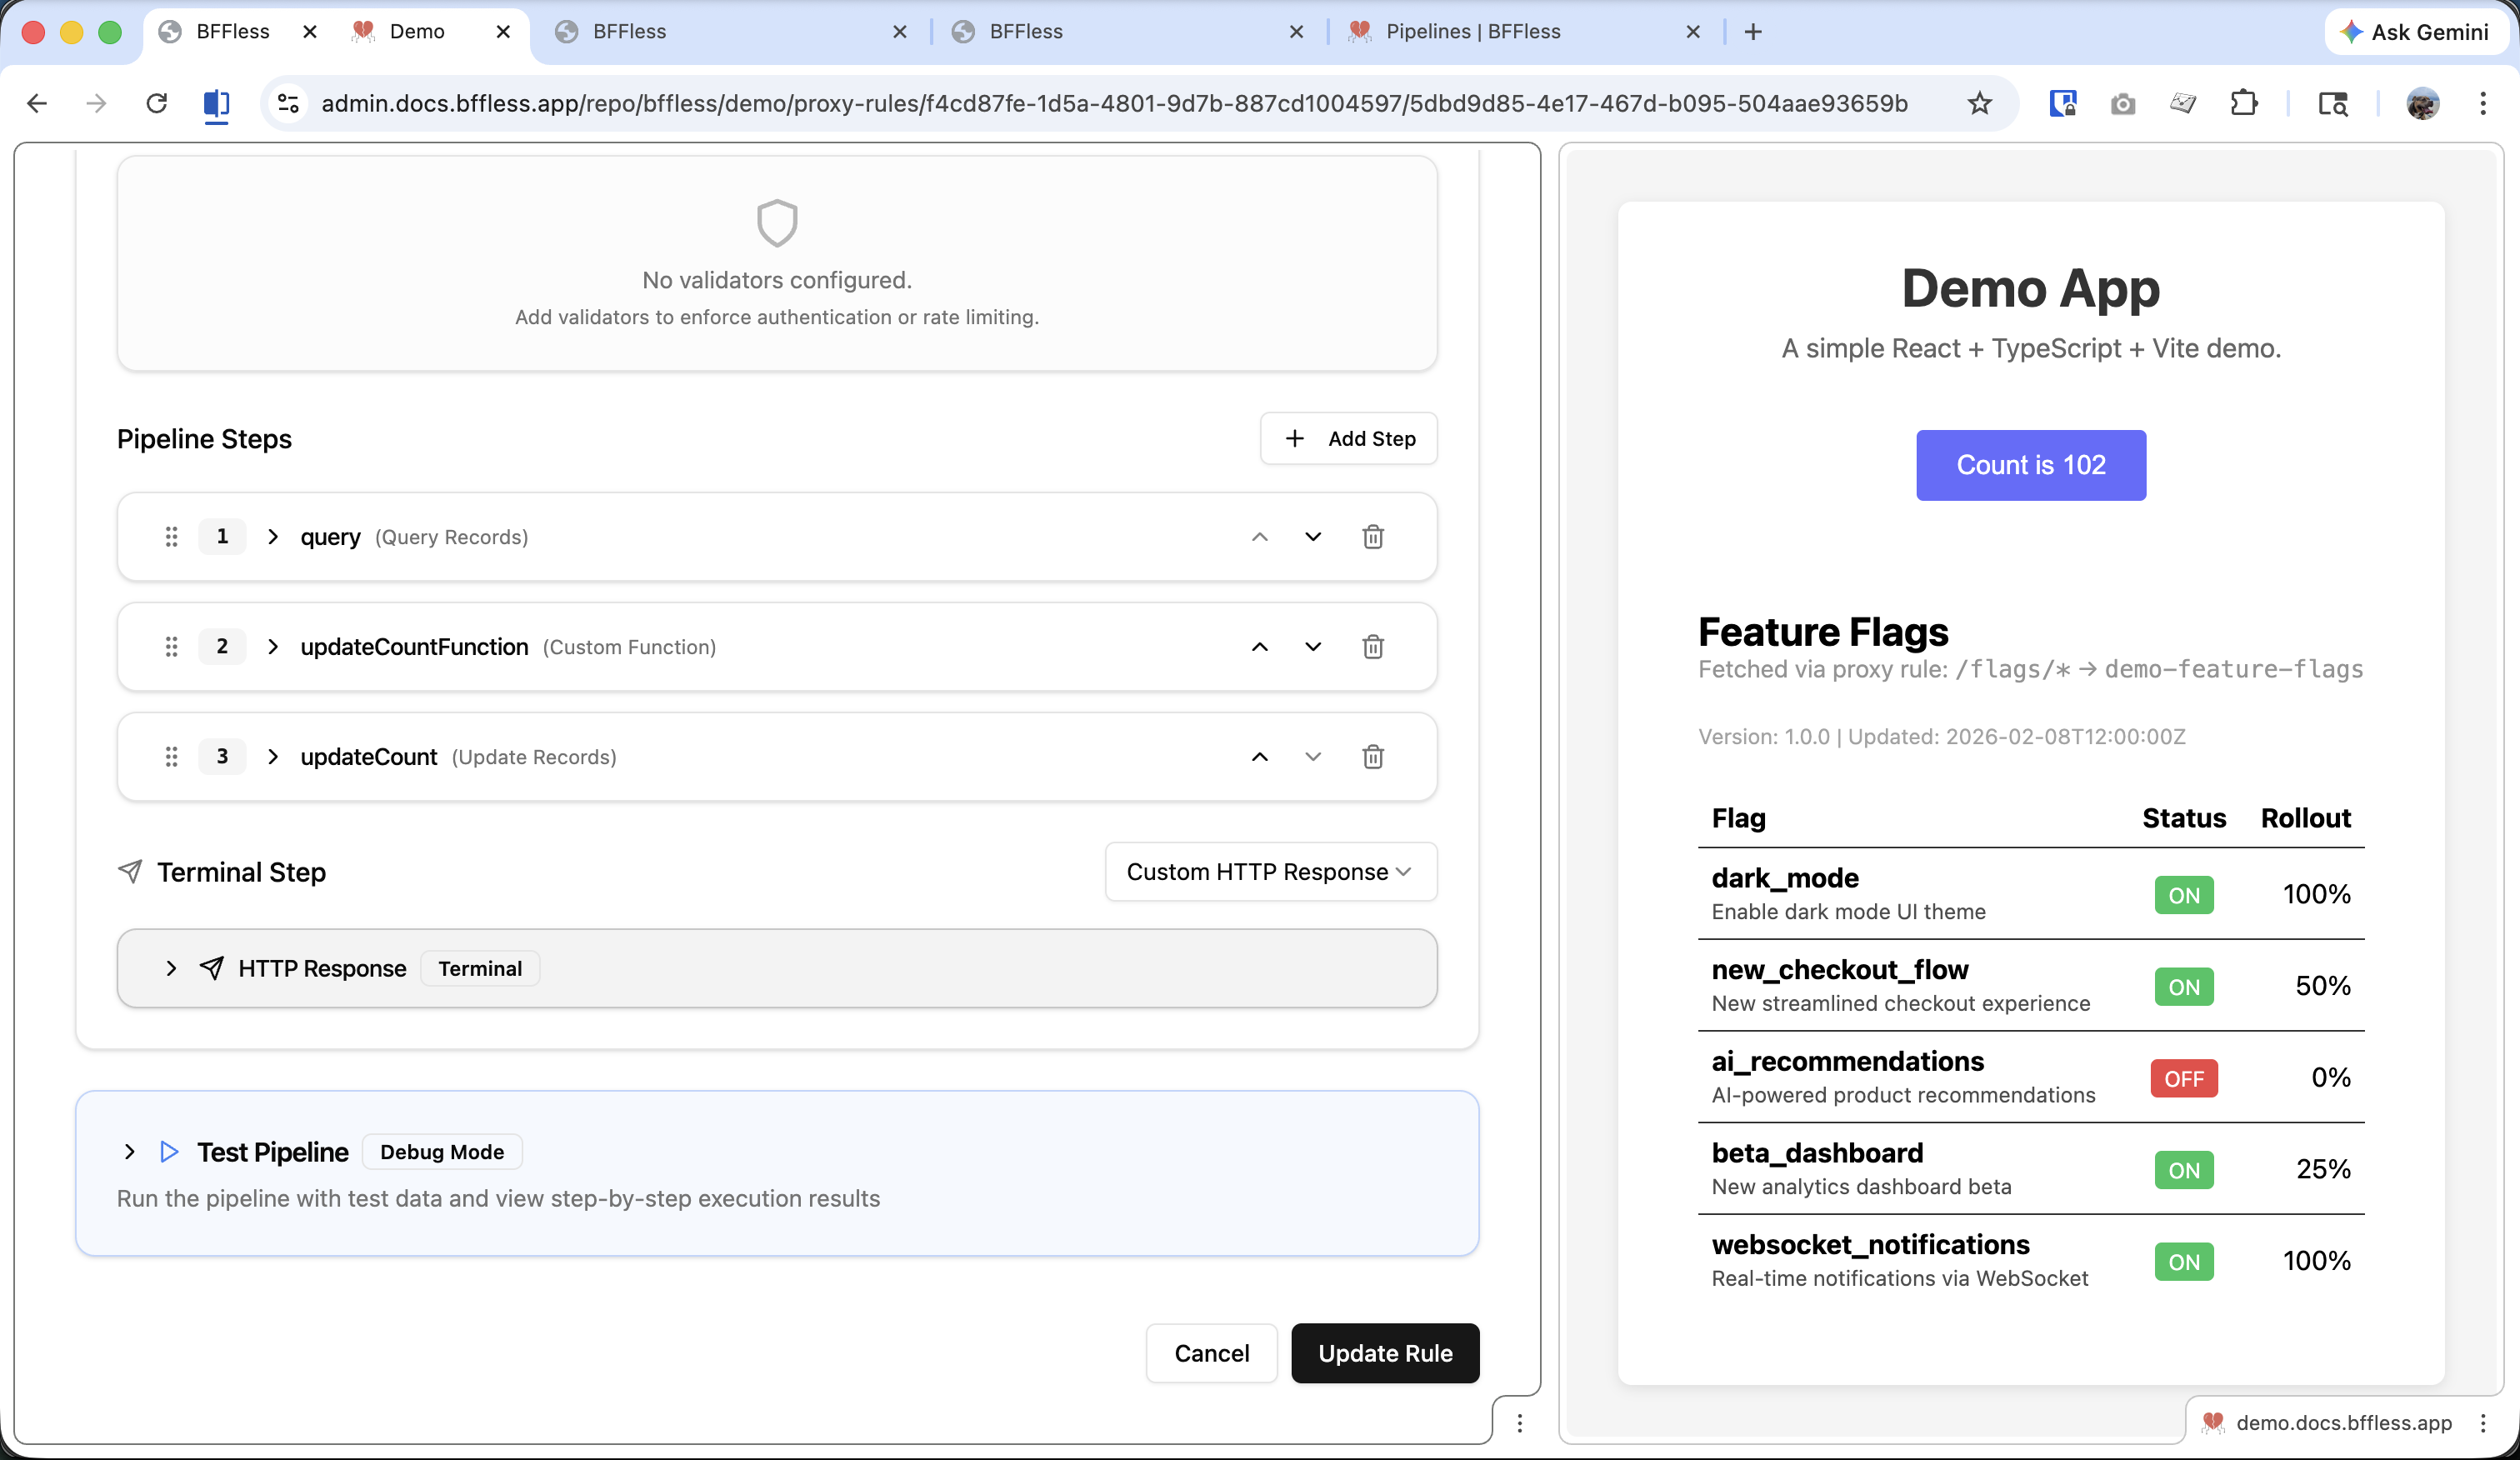
Add Handler 3: Update Records
Update the DB Record with the new values:
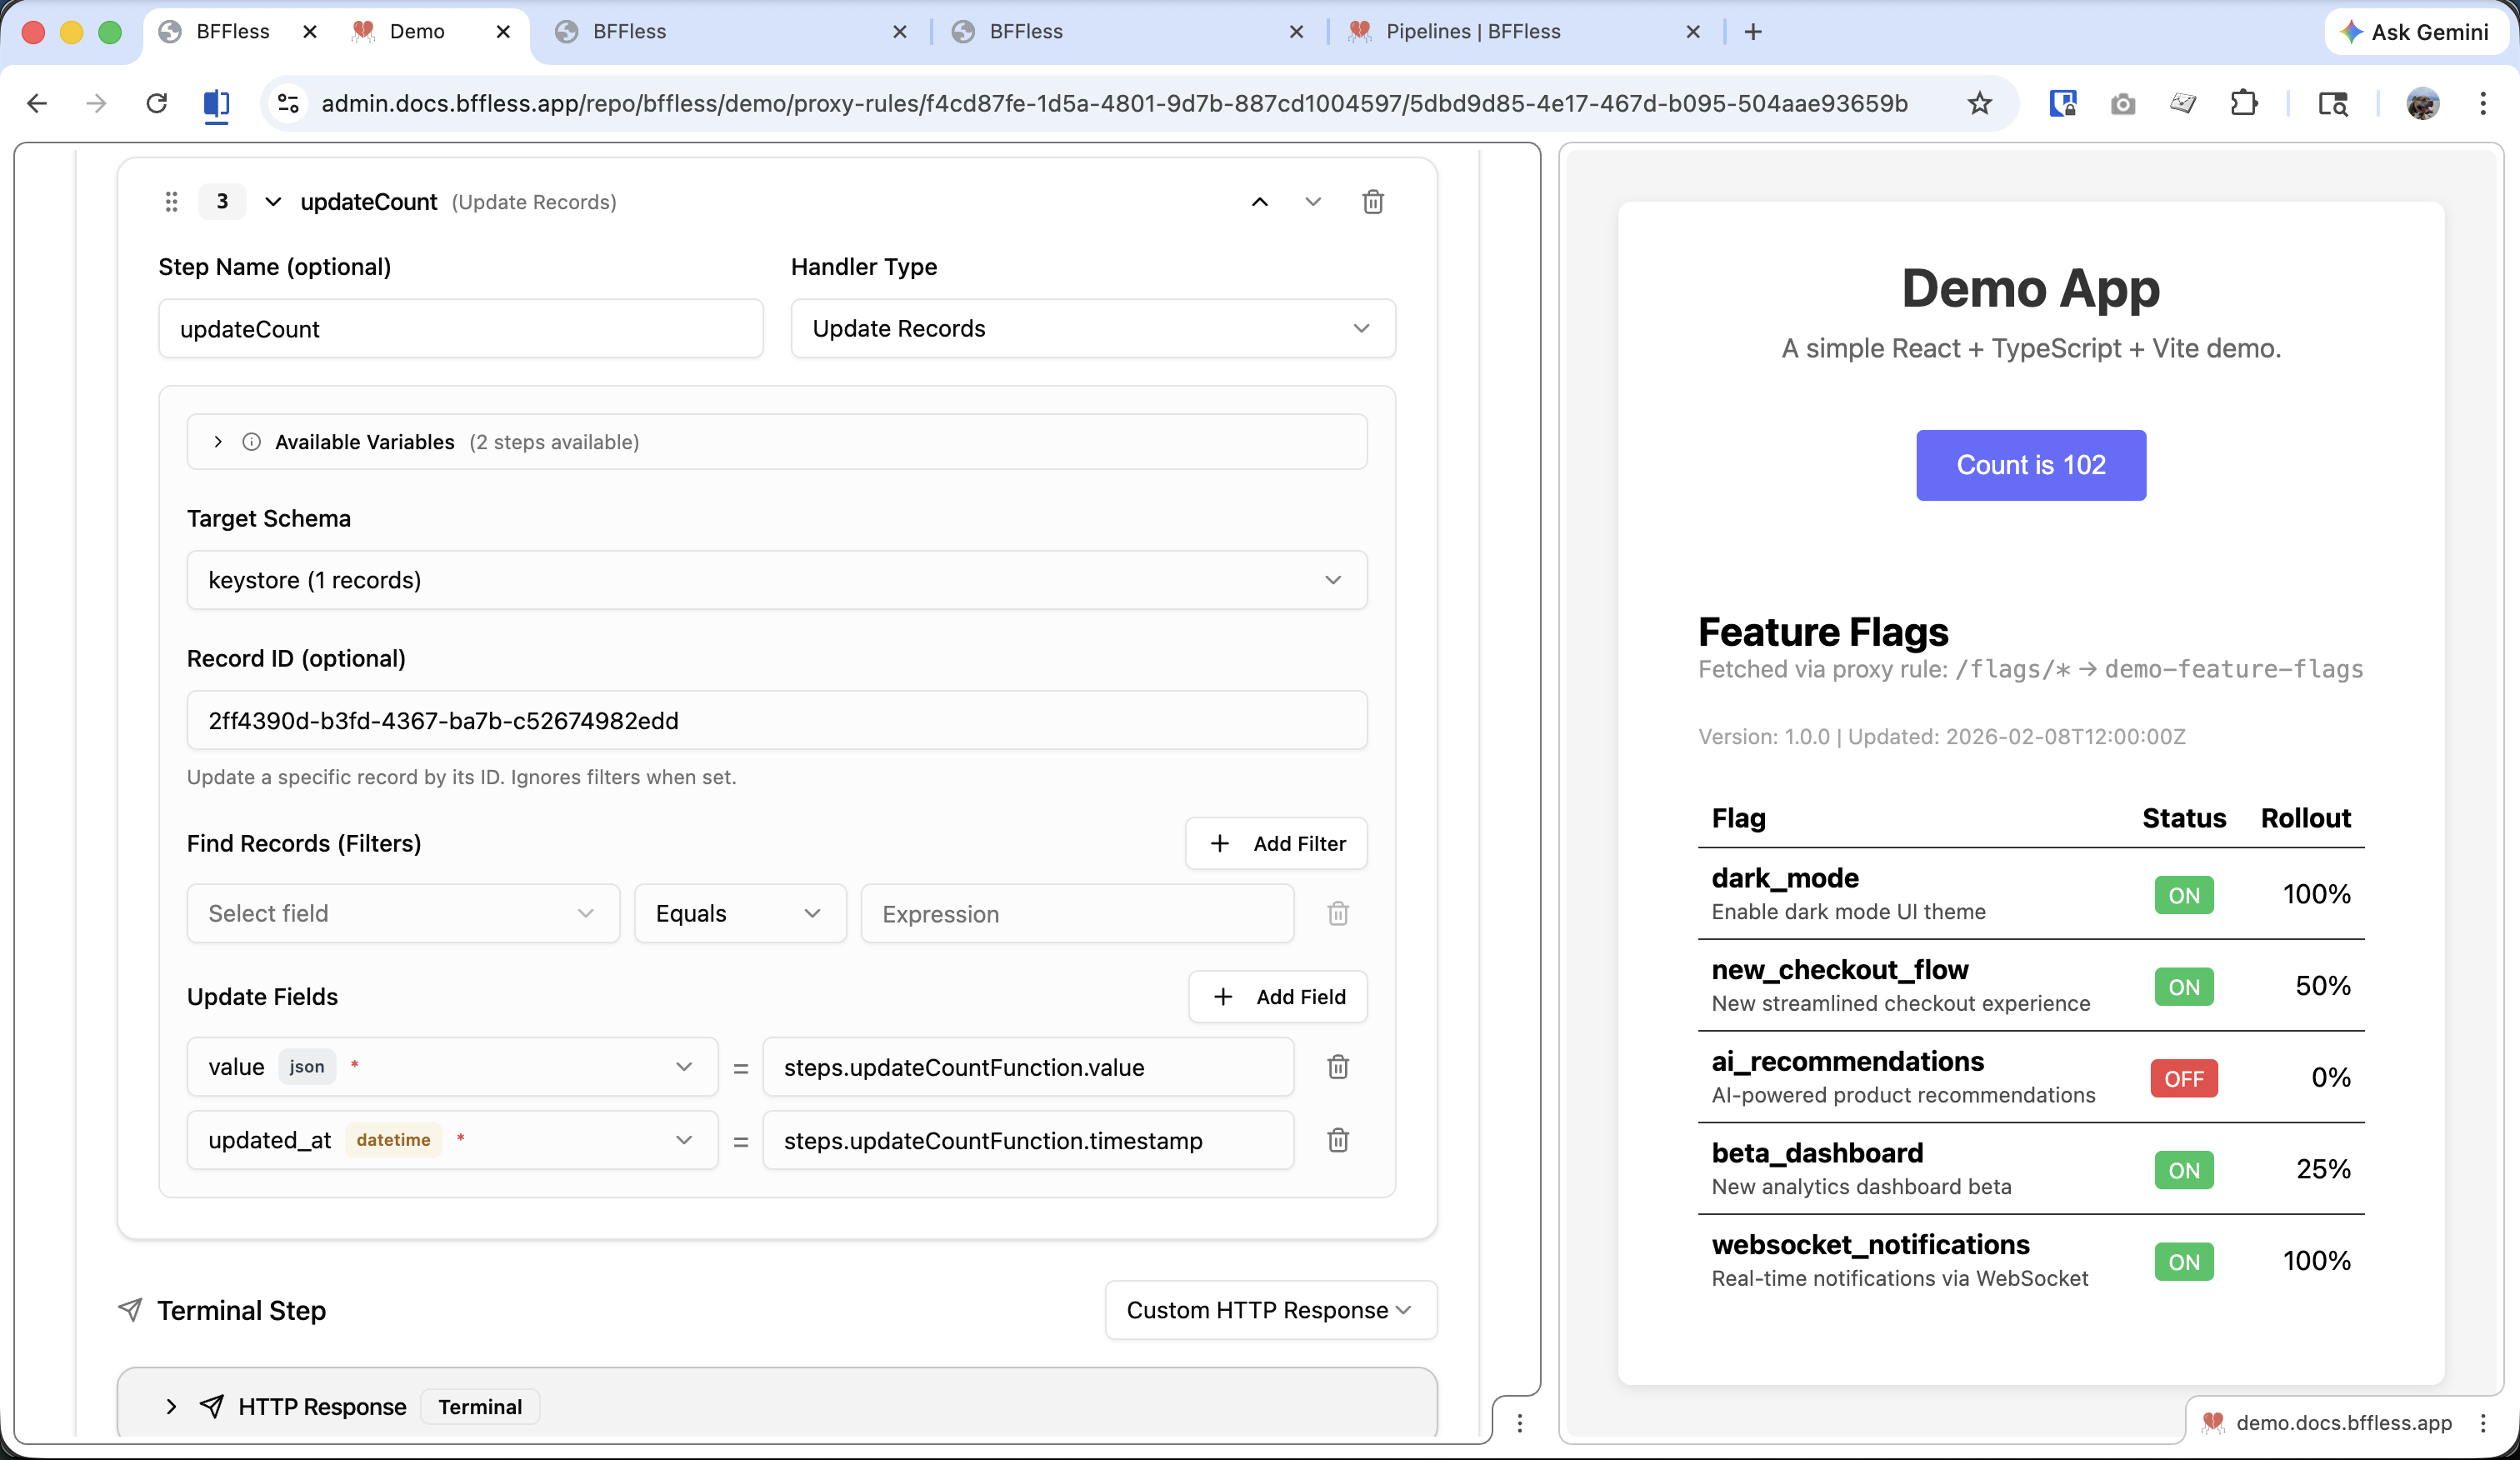
| Setting | Value |
|---|---|
| Handler Type | Data Update |
| Target Schema | keystore |
| Record ID | The UUID of your click_count record |
Map the update fields:
value→{{steps.updateCountFunction.value}}updated_at→{{steps.updateCountFunction.timestamp}}
Add Terminal Handler: HTTP Response
Return the updated count:
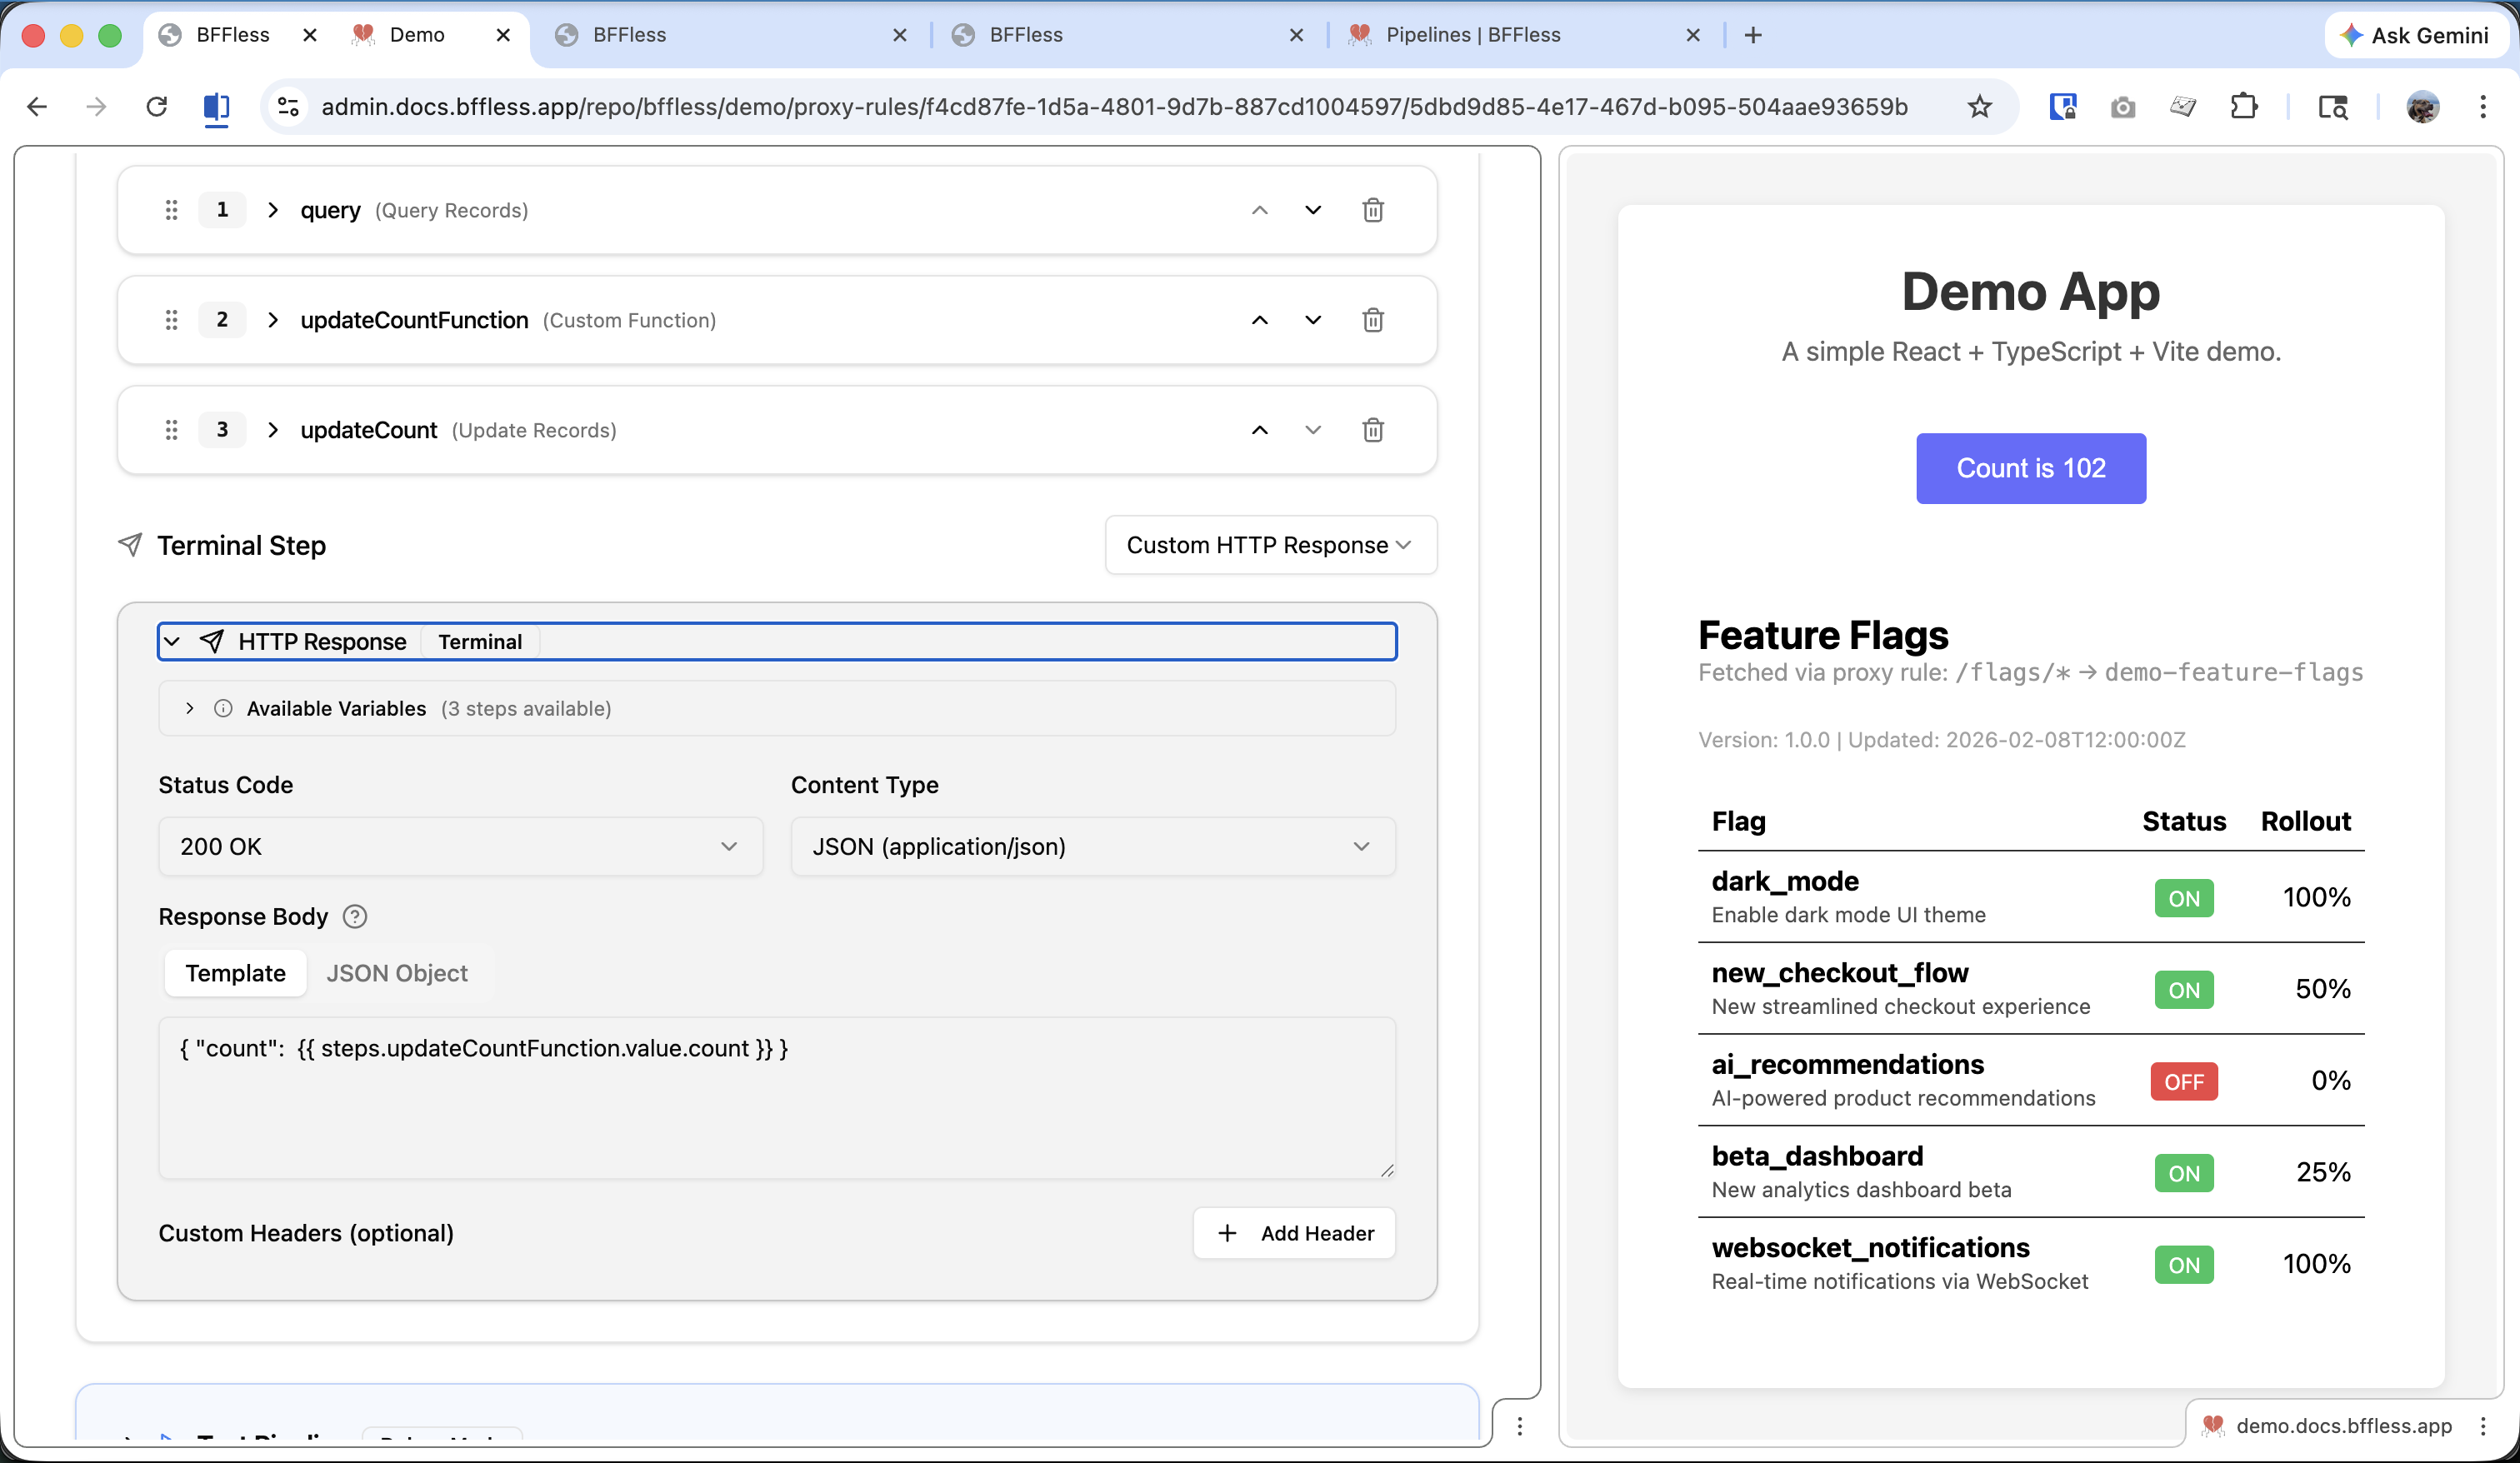
| Setting | Value |
|---|---|
| Handler Type | Response |
| Status | 200 OK |
| Body | { "count": {{steps.updateCountFunction.value.count}} } |
Pipeline Flow
Here's how the POST pipeline executes:
Step 4: Use from Frontend
JavaScript
// Get current count
async function getCount() {
  const response = await fetch('/api/count');
  const { count } = await response.json();
  return count;
}

// Increment count
async function incrementCount() {
  const response = await fetch('/api/count', { method: 'POST' });
  const { count } = await response.json();
  return count;
}

// Usage
const currentCount = await getCount();
console.log('Current count:', currentCount);

const newCount = await incrementCount();
console.log('New count:', newCount);
React Component
import { useState, useEffect } from 'react';

export function ClickCounter() {
  const [count, setCount] = useState<number | null>(null);
  const [isLoading, setIsLoading] = useState(false);

  // Fetch initial count
  useEffect(() => {
    fetch('/api/count')
      .then((res) => res.json())
      .then((data) => setCount(data.count));
  }, []);

  const handleClick = async () => {
    setIsLoading(true);
    try {
      const response = await fetch('/api/count', { method: 'POST' });
      const data = await response.json();
      setCount(data.count);
    } finally {
      setIsLoading(false);
    }
  };

  if (count === null) {
    return <p>Loading...</p>;
  }

  return (
    <div>
      <p>Count: {count}</p>
      <button onClick={handleClick} disabled={isLoading}>
        {isLoading ? 'Updating...' : 'Increment'}
      </button>
    </div>
  );
}
Tips
Use Meaningful Keys
When storing multiple state values, use descriptive keys:
feature_flags
user_preferences_default
analytics_session_12345
rate_limit_192.168.1.1
Handle Race Conditions
The simple increment pattern shown here is vulnerable to race conditions under high concurrency. For critical counters, consider:
- Atomic operations - Use a database that supports atomic increment operations
- Optimistic locking - Include a version field and retry on conflict
- Queue-based updates - Process increments sequentially via a queue
For most use cases (page view counters, feature flag reads), the simple pattern works fine.
Validate State Structure
Use the Form Handler before the Custom Function to validate incoming state updates:
{
  "fields": [
    { "name": "value", "type": "object", "required": true }
  ]
}
Add Error Handling
In production, wrap your fetch calls with proper error handling:
async function safeIncrement() {
  try {
    const response = await fetch('/api/count', { method: 'POST' });
    if (!response.ok) {
      throw new Error(`HTTP ${response.status}`);
    }
    return await response.json();
  } catch (error) {
    console.error('Failed to increment:', error);
    return null;
  }
}
Use Cases
This pattern extends beyond simple counters:
| Use Case | Key | Value Structure |
|---|---|---|
| Click counter | click_count | { count: 42 } |
| Feature flags | feature_flags | { dark_mode: true, beta_features: false } |
| User preferences | prefs_user123 | { theme: "dark", language: "en" } |
| Rate limiting | rate_192.168.1.1 | { requests: 5, window_start: "..." } |
| Session state | session_abc123 | { cart: [...], step: 2 } |
| A/B test assignments | ab_user456 | { variant: "B", enrolled_at: "..." } |
Related Features
- Pipelines - Full documentation on Pipeline handlers and expressions
- Proxy Rules - Alternative approach using external APIs